
By Bob Rush
After I showed my wife the first cab I completed in which I added details to the back, she asked when I was going to fit colored pieces of stone into the circular features on the back. I hadn’t thought about it until then, so I decided to give it a try for this month’s project.
After some searching, I found a suitable piece of Brazilian agate that had a dark lower pattern and a translucent upper area. The top layers had a thin, black pattern that was very close to the surface and limited my ability to get much of a dome on the front.
Creative Use for Back of a Cab
What I had in mind was to shape a small hemisphere of carnelian agate that would closely match the size and shape of the hole that I was going to make in the back. I had the concept that the carnelian would show through, much as the sun shines through the back of clouds.
I made sure that I could match the size of the diamond ball bur to the size and shape of the carnelian hemisphere. I started by shaping a disk from a thick slab of carnelian from which to make the hemisphere.
I made sure that the disk was thick enough—at least half the diameter of the original disk—to make a hemisphere that would match the depth of the hole in the back of the cab.
Utilizing A Sphere Cup
On my lapidary grinding unit, I roughed out the preform for the hemisphere. I took care to make the shape as round as I could so I wouldn’t have to spend much time finishing the shape in my small sphere cup. I found a cup that would allow me to get the right size for the hemisphere.
With the sphere cup installed in my flat lap, I used 220 grit and 400 grit to shape and sand the hemisphere. I didn’t have to polish it because the Epoxy 330 needs a slightly rough surface to get the best bond.
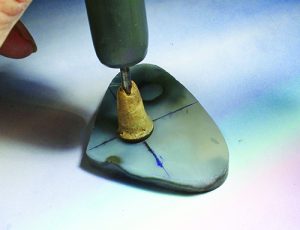
With the hemisphere shaped, I started grinding the size and depth of the hole with a slightly smaller diamond ball bur. It is much easier to enlarge the hole to fit the hemisphere than the other way around. This step went very quickly, and I got a near-perfect fit between the carnelian hemisphere and the hole in the cab. I mixed some Epoxy 330, glued the pieces together and left the assembly under my bench lamp to set up.
Unexpected Outcomes
My final steps were to finish shaping the dome on the front and polish the back.
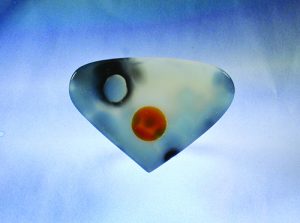
Unfortunately, the color from the carnelian didn’t project through to the front as I had expected, even though I had drilled the hole to within 1 mm of the front surface. Apparently, the translucent area of the cab wasn’t as clear as I had perceived it to be.
What turned out better than I had expected was the fit and color of the carnelian, as seen from the back. In my next project, I’ll be to explore fitting more and different colors of hemispheres into various cabochon materials.
Author: Bob Rush
 A professional within the lapidary industry since 1958 and metal work and jewelry since 1972.
He teaches at clubs and at Camp Paradise.


