
Knowing how to polish rocks by hand is handy after you’ve spent a day finding some nice specimens. Sure, your rock tumbling could be using a tumbler. Or you could discover the joy of hand-polishing your rocks. Hand polishing can turn a dull piece of stone into a gleaming beauty, but it takes a bit of time and elbow grease. Here’s how…
Why Hand Polish?
How to polish rocks by hand is something even the most novice and/or youngest rockhound can easily do. It requires only a few materials, doesn’t cost much and results in beautifully polished stones. Some people find the rhythmic motion of hand polishing to be relaxing, offering almost a Zen-like experience. Using the Mohs Scale of Hardness, softer stones like turquoise and amber work best for hand polishing. These stones often don’t fare well in a tumbler anyway, which is one more reason to polish them by hand.
How to Polish Rocks
Step 1
Start by cleaning the rock(s) by hand. Fill a small bucket with hot, soapy water to clean off dirt. If the stone has a lot of crevices or stubborn residue, an old toothbrush works wonders. Once the rock is thoroughly cleaned, rinse off the soap, then throw out the soapy water and refill the bucket with clean water to use throughout the process.
Step 2
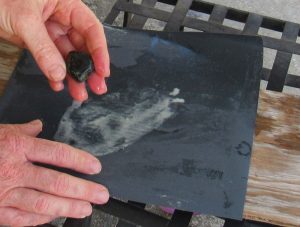
Round the corners and do some rough shaping with 220-grit sandpaper. Begin by moistening the sandpaper and placing it grit-side up on a cutting board or other hard, flat surface. Wet the rock, hold it in your dominant hand and begin rubbing it along the sandpaper to remove the hard edges. Continuously wet the rock to remove fine particles and continue the sanding process until the edges become smooth and rounded or you achieve the desired shape.
To shape and polish harder substances, opt for something coarser. Some people begin with an 80-grit, but sandpaper this coarse shouldn’t be used on softer stones because it could add more scratches than remove. A quick reminder – the lower the number, the coarser the sandpaper.
Step 3
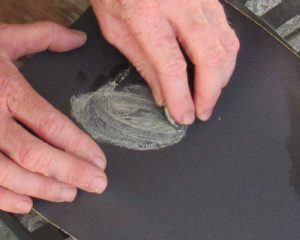
Refine the shape and remove heavy scratches with 500-grit sandpaper. Moving up to finer sandpaper helps remove significant scratches and helps further refine the shape. Keep the rock wet throughout the sanding process for better results.
Step 4
Remove lighter scratches and begin polishing with 1200-grit sandpaper. Using extra-fine sandpaper buffs out tiny scratches on the stone’s surface. The shine will start forming during this step. Make sure to keep the rock wet, rinsing it often to expose anything that’s been missed.
Step 5
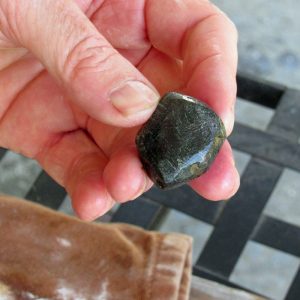
Dampen a square of thick cloth, preferably denim or similar material, and add a good dab of toothpaste. Work the stone through the toothpaste and over the fabric to create a beautiful luster. Depending on the stone, add more toothpaste several times until the desired shine is achieved.
“There are lots of polishing compounds out there,” said Allen McGhee, long-time rockhound and hand polisher. “But I’ve found that toothpaste works just as well, and it’s cheaper. Pretty much any toothpaste works, so don’t buy the high-priced ones.”
Step 6
Rinse off the toothpaste and coat the newly polished stone with mineral oil or a commercial rock polish to bring out the luster. Once the rock dries, it’s ready to show off.
How to Polish Rocks by Hand: Augmenting with a Dremel
A Dremel is a popular motorized rotary tool that’s handy for grinding and smoothing sharp edges and completing extensive shaping of hard stones, especially those with lots of crevices.
“You can shape and polish rocks and gems faster with a Dremel if you want,” said McGhee. “They make heads for them with all three levels of grit you need.”
When using a Dremel, protective eyewear is a must. Even small chips can damage an eye. Gloves should be used to protect hands. Sharp edges on the rock and the rotating tip of the Dremel can break the skin. Wearing a mask prevents inhaling the tiny particles coming off the rock as it is ground.
How to polish rocks by hand using a Dremel comes down to personal preference. Some prefer a more natural shape, so they do very little shaping but want to give their rocks a nice bit of shine. Alternately, a Dremel comes in handy for a perfectly smooth and/or rounded stone or for harder rocks that will take a long time to smooth by hand.
Tumbling Vs. Hand Polishing
Many people inadvertently think rock tumblers offer the fastest way to polish rocks. In reality, rock tumbling is a lengthy process that generally takes anywhere from several days to several weeks. The larger and harder the rocks, the more time tumbling takes. Hand polishing offers a quick turnaround for softer rocks.
On the other hand, rock tumbling is less labor-intensive since the machine does all the hard work.
Merits of Polishing Rocks by Hand
Although hand polishing can be time-consuming based on the hardness of the rock, it gives more control over the finished product. This control can be especially important if the final result will impact the quality, value and/or overall appearance of a rare or expensive rock or gem. Hand polishing can also give a desirable sense of accomplishment.
This story about how to polish rocks previously appeared in Rock & Gem magazine. Click here to subscribe. Story by Moira K. McGhee.


