
By Bob Rush
The final step to finishing a cabochon is to get a good polish on the back of the cab. When polishing flat surfaces most people conclude that they need a flat lap to do the job. Flat laps have been used for a very long time for lapidary work, even for the shaping of cabochons before the advent of the horizontal shaft lapidary machines.
Pros and Cons Of Flat Laps
For me, the problem with a flat lap is the time it takes to do the job. The various laps, whether they are silicon carbide sanding wheels or diamond coated solid wheels, always seem to wear out sooner than I would like. This causes a slowing of the grinding, sanding, and polishing. The center of these wheels turn so slowly that they aren’t very useful for the tasks as most of the use is on the outer edges of the wheel.
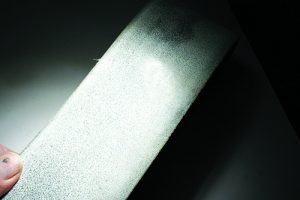
The way to remove the sanding marks on the backs of cabs and keep them flat is determined by the way you hold the piece up to the wheel. On a Genie machine, you start removing the saw marks on the 220-grit sanding wheel and then progress to the 400 grit wheel and then to a 3000 grit wheel, which should give you a very good polish.
Only sand in one direction on the cab so you don’t have to look for multiple sanding patterns to see your progress. Also, be sure to use a dop stick to hold the cab so you have better control.
Working Out from the Center
Start sanding in the center of the cab and move it up and down towards the ends of the cab. Do not tip the cab towards you as you get near the end of the cab or it will end up rounding the ends. Lift the cab straight up as you get to the end of the cab. Turn the cab 180 degrees and sand up to the other end of the cab; again, avoiding the tendency to tilt the cab towards you. Use this method on all of the further steps on this machine.
On my 8-inch wheel machine, I use the same motion to polish large cabs up to 6” across as well as sanding the face of slabs. The major difference in my procedure on this machine is that I do all the sanding steps dry.
You also must use respiratory protection masks suitable for your personal respiratory health because of the generation of hazardous silica dust. A dust abatement method such as an exhaust fan is also highly recommended.
My first sanding step is done with a very well-worn 100 grit expando silicon carbide belt. This belt is so worn that the belt surface is shiny. On cabs or slabs where the saw marks are rather prominent, I use a less worn 100 grit belt. Always move the slab up and down in the same way as you did when working with the Geni machine.
Sanding Position is Key
On the 8-inch machine, you can work slightly under the wheel if there is room to do so. This will allow you to see the work being done. If you can’t reach all the way across the slab turn it 180 degrees and continue sanding the piece. If you are working with obsidian do not sand up to the top edge facing you because it will overheat, and a very small chip will dislodge and drag across the face of the slab. This will cause a scratch on the slab. Only sand to the edge on the lower side of the slab.
Any chips that form will be carried away from the slab. The end result of
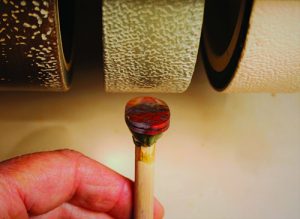
sanding on the very well-worn 100 grit belt will be a very fine parallel line pattern. If it is noticeable, I sometimes go to a very well-worn 220 belt. At this point, I go to my slow turning 12-inch carpet covered polishing wheel using cerium oxide polish to finish the slab.
All of the steps can be illustrated by simply looking at a single piece, as demonstrated in the third photo above.
Author: Bob Rush
 A professional within the lapidary industry since 1958 and metal work and jewelry since 1972.
He teaches at clubs and Modesto Junior College.


