
By John Speck
In a moment of sudden clarity, I came upon the solution that I had been seeking for several months. Isn’t that how it often seems to go?
Being retired for almost a year at the time, I realized my life consisted of daily tasks related to various honey-do’s and lapidary projects. Twelve months earlier, the idea of having plenty of free time to do all those things that I had been putting off for years seemed like a dream come true. But recently, my life had become too routine and lacked the challenges that I had previously faced on a day-to-day basis while I was working. Then I had the answer: I would starting teaching lapidary.
This was going to be great! I had never taught before, but I had collected, cut, and polished stones since I was 10 years old. This was going to be easy, I thought. I live in San Antonio, Texas, and there must be several places that teach lapidary. All I have to do is contact them and let them know that I would like to teach. As you can probably already guess, it would not be as easy as I thought.
Instead of that marking the end of my story, it turned out to be just the beginning.
Possible Blueprint for Club Project
It is my hope that the rest of this article will become a blueprint to motivation other rockhounds. My first step was to do an online search for “lapidary classes San Antonio.” To my surprise, I was unable to find anyone teaching lapidary. In the past, some of the rock shops in San Antonio offered lapidary classes. In the 1970s, there were four major rock shops in town. Today they are all gone. I was beginning to realize how much things had changed over the years.
Finally, I found one place that offered lapidary classes. When I called them, they informed me that they no longer offer classes. They told me that after two years of offering classes, they had only one student. So, they got rid of all their equipment and quit offering classes. It was their opinion that “people are no longer interested in anything other than playing computer games.”
Over the next several months, I would encounter this general negativity again and again. I simply could not buy into this. There had to be people interested in learning about gemstones and lapidary.
Drawing from my past work experience, I knew that to succeed, I needed to define my goal. My goal became “to reach out and introduce people to the exciting hobby of rockhounding.” This would include collecting rocks, gems, and minerals; and lapidary.
Progress Through Partnerships
During this time, I was taking an art course through the Northside Adult & Community Education program. I met with one of the staff members and presented the idea of teaching courses on Gems & Minerals and Lapidary. The staff coordinator enthusiastically supported the idea and felt that there was appropriate class space. In addition, the courses would be advertised in their class catalog.
The problem was that there was no money for lapidary equipment. I realized that I could teach about gemstones with the material that I had collected over the years. However, I saw the gemstones class as a conduit for getting students into lapidary. So, I decided I would not offer one without the other. Now I had to figure out how to raise the money for the equipment.
Club and Community
I have been a member of the Southwest Gem and Mineral Society in San
Antonio since 1972. In those days, we went on frequent rock collecting trips and had regular attendance of 75 or more people at monthly meetings. In recent years, the number of rock collecting trips has become just a few each year and commonly our monthly meeting attracts between 25 and 30 people.
Several of my fellow club members were becoming concerned, as was I, about the future of the club. From what I read in Rock & Gem magazine, this is a growing problem with most rock clubs. Articles written over the last several years offer many possible solutions. I was in the process of formulating my own idea.
On the positive side, Southwest Gem and Mineral Society currently has one excellent rock collecting site that we visit two or three times a year. Our club also hosts a great rock show each March. Over the years the club has been able to reserve a reasonable amount of funds for club projects. Based on discussions with several key board members, I put together a proposal to present to the club during
the October 2016 meeting.
I provided a summary of my idea for gemstone and lapidary courses. I explained that I planned to teach two courses during the winter semester at the Northside Learning Center.
COURSE 1: Introduction to Gemstones
In this hands-on course you will gain a basics knowledge of precious and semi-precious gemstones. You will examine actual gemstones, find out where they come from and learn their values. Included is an introduction to rock collecting with an emphasis on Texas collecting sites. You’ll also explore the basics of lapidary, including handling rough and finished gemstones. In this course, you’ll also learn to distinguish natural gemstones from imitations, and examine the mystic power of birthstones. Start on your journey to becoming a knowledgeable gemstone customer/collector with this course.
As part of this course, I explained that I would be promoting the Southwest Gem and Mineral Society, encouraging participants to go to the monthly meetings and join.
COURSE 2: Gemstones and Lapidary
 In this course you will learn how to cut and polish gemstones employing the art of lapidary. You will create finished gemstones that can be used to make beautiful jewelry. During the course of the class you will make two to three finished gemstones.
No prior experience is required. All that is required is the desire to create your own valuable gemstones. Class size is limited to eight to ensure everyone gets adequate instruction. You will be working with and learning how to use diamond-based lapidary equipment.
In my motion I also outlined the cost of the equipment needed for the course and explained that the Southwest Gem and Mineral Society in San Antonio would be a sponsor of the class. The cost outline, with estimated cost, included:
• 8 All-U-Need Lap Machines ($3,600)
• 2 Rock Rascal Model J Trim Saws ($660)
• 2 Dop Buddy machines with extra dop wax ($106)
• Extra 80 mesh, 220 mesh, 3000 mesh diamond discs with backing plates ($972)
• 4 metal templates ($36)
• Misc. ($126)
Total: $5,500
I also proposed setting up the equipment for hands-on demonstration during the club’s show and special events. The motion passed and I was off and running.
Detail-Driven Project
I was now committed. Looking back on it, this could have been one of those “be careful what you wish for” moments. During the following two years, I was extremely busy, often challenged, always learning and rewarded beyond my greatest expectations.
Perhaps an appropriate quote for me would be “love what you do and you will never work a day in your life.”
The first thing I had to do was submit lesson plans for the gemstones course to my supervisor at the Northside Adult & Community Education program. My wife, Lydia, who is a school teacher, was a great help to me in creating lesson plans.
In general, my biggest problem was having too many rocks to show and too much material. I had to plan well to make sure that everything was covered in the allotted time.
Something I discovered during this process was the value of class evaluations. When I took courses in the past, I disliked filling out class evaluation forms. I figured they were a waste of time and no one ever read them.
As I said, this has been a learning experience for me. At the end of each course, I look forward to reading the evaluations. They serve to reinforce my passion for teaching and, most importantly, are vital in helping to improve the courses.
The next step in the planning process became the most challenging and rewarding part. It is one thing to putter around in your shop cutting, grinding, and polishing gemstones. It is another thing altogether to create an efficient and effective lapidary system to teach eight students at a time.
The following is a detailed description of what I needed to do, how I accomplished it, and the results. I feel that it is important to be very detailed in what I present so that someone in the future will not have to recreate the wheel.
Building an Effective Work Station
First, I knew that the setup would have to be mobile. Each time I teach a course, I have to set up at the beginning and take down at the end. Please keep this in mind as I go through the process. Special-purpose tables needed to be constructed.
During the planning process, I had decided to use the 6” All-U-Need LAP
Machine. I purchased all of my lapidary equipment and supplies from Kingsley North, Inc. They were truly a one-stop shop for all my needs, their pricing was fair, and their salespeople were friendly, helpful, and knowledgeable.
The All-U-Need sanding disc area is 11” high from the top of the table. The special-purpose tables, therefore, were built to be 15” high. This put the working area at 26”. This has turned out to be a perfect working height. One of my students was in a wheel chair, and this was a good height for him to do the work.
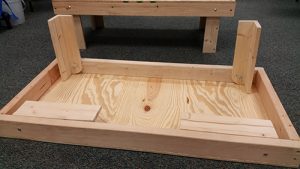
Early on, I also decided that eight students would make a good class size. As it worked out, I cut four 24” by 48” table tops form a 48” by 96” piece of 1/2” CDX plywood. The tops were screwed to rectangular frames made from pine 2x4s. The foldup legs were made from 1” by 4” pine planks, which were screwed together at a 90-degree angle. The top side of the leg was cut with a quarter circle so it could fold.
The length of the leg was 14” and each leg was attached to the underside of the table with a 3/8” carriage bolt and a wing nut. About 1” from the bolt, a wood screw was used to keep the legs locked into position. The table size allows for two people at each table, one at each end. The table legs fold nicely, making them easy to stack.
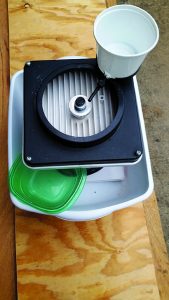
One of the club members suggested that I do something to catch dripping water. The best solution was an 18-quart Sterilite dish-washing tub with dimensions of 17-1/2”l, 14-1/4”w, and 7”h. The All-U-Need fits nicely in the tub and catches any excess water. I found a small square plastic dish, (Rubbermaid pan 5.2 cups; 6”l, 6”w, 3-1/2”d). It fits perfectly in a corner of the tub under the lip of the All-U-Need unit. The top of the dish sits on the top corner of the tub. I discovered that it is better not to attach the drip hose to the drip lip. It is not necessary in this configuration, and it is easier to dump the water when the dish fills up.
Each station also includes a small plastic dish with water to clean the stones during the grinding and polishing process. If you do not supply the dish, students forget and dip the stones in the drip water supply bowel. Of course this is a big “no-no” because you never want to contaminate the drip water supply.
Each tub is numbered, and students are asked to use the same unit each time. We do this for two reasons: the drip units are very quirky and once you figure out how yours works, you do not want to use a different unit; and at the end of each session, each student is responsible for cleaning their space. Each station consists of the All-U-Need unit, a water drip bowl, a drip water catch dish, and a small dish for cleaning water. All of this stores nicely in the tub.
Each station gets seven grinding/polishing discs. The seven discs are: 80 grit, 180 grit, 220 mesh, 325 mesh, 600 mesh, 1,200 mesh, and 3,000 mesh. The All-U-Need unit comes with the 180, 325, 600, 1,200 and a polish pad with 14,000 diamond mesh compound. I added the 80 mesh because it is much more aggressive on hard stones like agates and jaspers. The 220 mesh was added because I felt that it was too great a jump from 180 to 325. Last of all, I added the 3,000 as a final polish.
I do not use the polish pad with 14,000 diamond mesh compound. I realize that not using the polish pad will upset a lot people that have been doing lapidary for a long time. If this does not upset you, don’t worry, there are several other things that I will mention in this article that probably will upset you.
In my defense, I had many issues to consider. In all cases, I try to explain to the students why I do the things the way I do and other options as well. For example, some people in the club asked why I chose the All-U-Need unit instead of one of the vertical units that do not require changing wheels as you move to different mesh sizes. The first answer is mobility. The All-U-Need unit has a nice foot print that fits in a 17-1/2” by 14-1/4” tub. The footprint of the vertical units is much larger.
Remember, these units must be mobile. The second answer is cost. A complete vertical unit can easily be $1,300-plus. The cost of The All-U-Need unit, with the extra discs that I add, is less than $600.
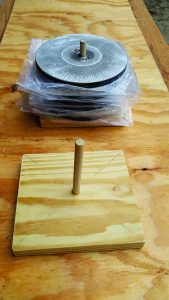
As I mentioned, there are seven grinding/polishing discs. There had to be a way to stack the discs. I started with a 1” by 6” by 4’ pine wood plank. I cut this into eight 6” sections. In the center of each I drilled a 3/8” hole about 1/2” deep. Next, I cut a 3/8” diameter wood dowel into eight 4-1/2” sections. Lastly, I glued the dowels into the planks.
The project resulted in a great stand for the discs. Each disc is stored in a plastic sleeve to keep them from sticking together. Each student is responsible for cleaning and restacking their discs at the end of each session.
Choosing Equipment
For templates, I chose to use the aluminum Gem-Temp J-325. This has most of the standard ovals and circles. Each student starts by cutting two 30×40 cabochons. I like to mark the front and back of slabs, so I bolted together two templates that are identical. I was able to find a piece of 1/4” plastic. I cut it 3/4” by 6”. You need to sandwich the plastic between the two templates. Be sure that the templates are perfectly aligned! When perfectly positioned, I used two small vices to hold the three pieces together. Then I drilled three holes in the bottom of the template.
Make sure that the drill bit you use is the same size as the bolts because you do not want any movement once the nuts are tightened down. I also have some templates that can be used for checking the size of the cabs as they are being shaped. I do all the marking with permanent black markers with thin points. When students mark their slabs, I recommend that they put a “b” on the back of their slabs for reference as they go through the process. I like the permanent markers because their lines are easy to see, and if you make a mistake they can be easily removed using acetone (finger nail polish remover).
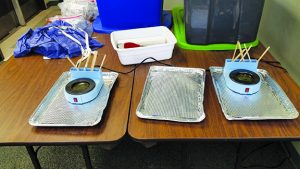
Another critical piece of equipment is the saw, of which we have two. Both are 6” Rock Rascal Model Js. The saws are placed in an extra-large kitty litter pan that is 16-1/2”w x 22”l x 5”d to catch the splash water. The saws were chosen because they were a good value for the price.
Students wear eye protection any time they are running a machine, and most chose to wear a plastic apron, especially when using the trim saws. I explain to the students that if they have a saw at home, they should use oil or a water additive.
Dealing with Dop Wax
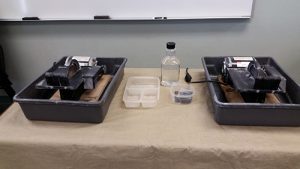
When I was planning this course, one of my biggest concerns was melting dop wax. I was once told that you could use an old iron to heat your stones and dop wax. The problem was that I could not control the temperature, so the wax would start to boil and smell. Frequently, heat sensitive stones would crack. Dop would get so hot that it would run off the stones. It was a real mess. I decided to buy two Dop Buddies to see for myself. To say I was surprised is an understatement. I felt like I had died and gone to heaven. For $35, why had I waited so long to buy one? When heated, the dop wax does not smell.
Dop is melted at the correct temperature. Stones are heated at the correct temperature. Dop does not run when being attached to the stone.
As I said before, this has been a learning experience for me. In case I did not make myself clear, if you don’t have a Dop Buddy or some similar product, buy one! The Dop Buddies are placed on non-stick aluminum baking pans. The dop wax does not stick to the pans and the pans protect the table tops.
Another thing that has changed for me as a result of this course is grinding. I started lapidary when I was in fifth grade. That was about 55 years ago. My parents bought me a gem making machine for Christmas from an ad in Popular Mechanics magazine. The cost was $29.50. I still have the ad. That was a lot of money for my parents at the time. But it turned out to be one of the most important and lasting gifts that I ever received. I still have the machine, although I don’t use it anymore. Even
today, I cannot look at the gem maker without remembering my parents.
As a parent and teacher, it is a good lesson to remember as we interact with our children, grandchildren, and students. We may be planting a seed that will grow for the rest of their lives!
The reason I mentioned the gem maker was that it was all silicon carbide. It used a silicon carbide grinding wheel and silicon carbide sanding discs. Most of us who have been rockhounds for many years probably started out with silicon carbide. Over the years, I have moved to using diamond for sanding but continued to use a silicon carbide grinding wheel. Several years ago, I built a grinding unit out of wood and used a 1/2” arbor with a 100 grit grinding wheel. It was messy, throwing off water, and needed to be constantly redressed with a diamond dressing bar. For some reason, I felt that a diamond wheel would be too slow compared to the silicon carbide grinding wheel.
Before starting to teach, I tested my system to make sure it would work well in a classroom situation.
I started with slabs and worked through to the finished cabs. I did two stones at a time to best simulate a classroom situation. I needed to know how long my classes needed to be to finish four to six cabs. I was amazed how quickly I was able to grind a cab on the 80 grit diamond disc.
After 45 years of use, I have now decommissioned my old 100 grit grinding wheel!
I am still learning.


