For the studio jeweler, the ultimate in precious metals recycling is the ability to transform bench scrap into material that can be used to make more jewelry without having to send the scrap to the refiner. Here’s how to make a textured sheet using bench scrap.
What Scrap to Use
By taking a bit more care to avoid contamination during the collection process, clean metal filings and scrap can be recycled in your studio. This saves money by eliminating both shipping costs and refining fees.
Ideally, scrap used for this technique should be clean and must be solder-free. Hair, paper or plastic will burn off during the heating process, though excessive amounts could affect fusing on traditional sterling.
Steel filings may fuse, but will be a different color; sand will cause a non-uniform surface. Scrap that contains solder or excessive amounts of other contaminants should be stored separately. Scrap containing solder must be sent to the refiner for refining.
Creating Surface Embellishment
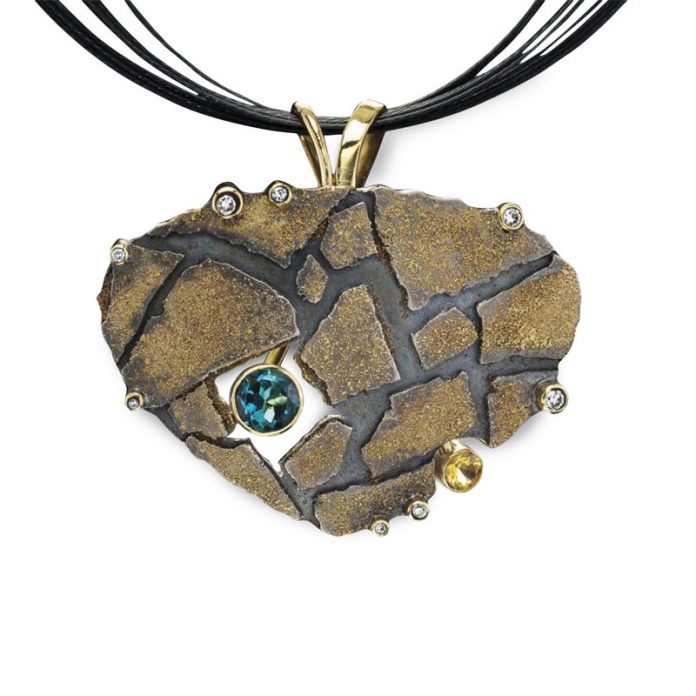
You can fuse bench filings and scraps to sheet metal to impart texture and surface embellishment. The techniques outlined in this article were perfected by Jenny Reeves, a jewelry designer and instructor at the Revere Academy in San Francisco. Jenny creates her award-winning jewelry using Argentium® sterling silver with high-karat (18k and higher) gold. Traditional sterling silver and copper, brass and bronze also work well for this technique.
Clean filings are the main ingredient. As you work, you will likely create larger pieces of scrap. These larger pieces can be converted into smaller, fusible elements to use with this technique. Filings can be made from sheet or tubing scrap by securing it in a vise or hand vise and filing it over a collection paper.
Making Granules
Granules, which are also easily fused, can be made from wire scrap. Use a washer as a jig to cut lengths of wire that are a uniform size. Place a washer on a flat work surface. Put the wire in the center of the washer, holding the end of the wire against the flat work surface, and snip with flush cutters held flush with the top of the washer.
Stack several washers together to cut a longer piece of wire, which will result in larger granules.
Place the bits of wire on a charcoal block, heat them to form balls, then pickle them. To create balls that are more uniformly round, tilt your charcoal block so that, as the wire forms into a ball, it will roll off the block and quench in a bowl of water placed below. Separate the granules by size and store them in labeled containers.
Creating Texture with Filings & Granules

Apply filings and granules to the surface of sheet metal and heat the entire piece until the filings fuse to the surface. Different fluxes and application methods will produce different textures.
You can create fine, uniform textures or random, organic textures depending on which combination of techniques you use.
The surface of the sheet metal must be clean and free of any oxides or oils for fusing. Clean the surface using an abrasive pad and warm, soapy water, rinse thoroughly, and either allow the piece to air dry or dry it with a clean bench towel. Handle the metal by the edges after cleaning it.
Applying Flux
Surface oxides will inhibit fusing, so it is important to protect the metal’s surface during heating. Paste flux works well to keep the surface clean because it can withstand the high temperatures and extended heating time required for fusing. Argentium sterling silver fuses more readily and therefore can be fused using liquid yellow flux.
Apply flux only to the areas in which a textured surface is desired. The filings and granules will generally fuse where applied if you allow the flux to dry before heating, either by placing it under a bench lamp, using a heat gun, or heating the piece very slowly with a torch. If the flux is wet when heat is applied, it will bubble as it dries, causing the filings to form rivulets and fuse in jagged patterns. Experiment using a combination of wet and dry flux to create a variety of interesting effects.
Applying Filings
A variety of methods can be used to apply filings to the metal surface to produce different effects.
To create a fine, uniform layer of texture, apply filings with a sifter. Use a commercially available enamel sifter or make your own from a piece of screen and some PVC pipe. Allow the flux to dry before heating or slowly heat it with the torch.
Use tweezers for precise application, for example, placing filings inside wire cells and on layers of previously fused sheet. For an organic, random texture, apply filings with your fingers.
To mask off certain areas when applying filings, use a template or stencil. Use a brush to remove filings from dry areas, or use the tip of a saw blade to eliminate unwanted filings from tight spaces.
Remember to apply flux only to the areas in which a textured surface is desired.
The Fusing Process

JENNY REEVES PHOTO
During the fusing process, the metal is heated until the surface becomes liquid for an instant, fusing the surfaces without melting the whole piece. This process is called liquid-phase diffusion bonding and can be accomplished through controlled heating. Successful bonding can be accomplished by heating the base sheet to the fusing temperature without overheating the filings, which can cause them to form balls or melt into puddles.
The two recommended heating surfaces are a charcoal block and a beehive kiln. Charcoal retains heat and creates a reducing atmosphere, which helps prevent oxidation. A preheated charcoal block will act as a mini-kiln, heating your sheet from below as you heat it with the torch from above. Beehive-style, or trinket, kilns work well for fusing. Paint the back of your piece with yellow ochre before applying filings to prevent it from fusing to the kiln surface during heating.
Fusing the Filings
To fuse, apply filings, allow the flux to dry, and place the piece on either a pre-heated charcoal block or a trinket kiln. Using a neutral flame, begin by heating around the edges of the piece. Once the flux stops bubbling, move the flame across the entire surface of the piece. Keep the flame moving to heat the piece evenly and avoid overheating the filings. Alternate between edge and surface heating to bring the base sheet to fusing temperature.
Watch the surface of the metal closely. When it appears wet (often referred to as a “flash”) or the filings appear to move or “boil”, these are indications that fusion is occurring. Different metals will look different as they fuse, and the signs may be tricky to recognize at first. A little practice will quickly help you develop an eye for the fusing point of each metal. Some jewelers prefer to use a bright light to help them see the flashpoint, while others prefer dim lighting. Try fusing with and without a bench light to determine the best method for you.
To determine whether the filings have fused to the surface during heating, allow your piece to air cool completely and press the filings with your finger. If they move, re-fire the piece, adding flux if necessary.
If the filings do not move, inspect the piece under magnification to determine whether the filings are in fact fused or simply held in place with flux. If they appear to be fused under magnification, pickle the piece and clean it with a brass brush. If the texture remains, the fusing was successful! If it doesn’t, re-apply filings and fuse again. Experiment using single or multiple layers of filings, wet and dry flux, and mixed metals to achieve different effects.
Finishing Up
Textured surfaces may be rough to the touch. Lightly sand or file the surface to make the piece comfortable to wear and less likely to snag clothing. For pieces with a fine layer of filings applied with a sifter, lightly pass the piece through the rolling mill using very minimal pressure to smooth the surface. Note that too much pressure will dramatically change the texture, and possibly even remove it entirely. Use a brass or steel brush to “unify” a matte surface, or a use burnisher to make it sparkle.
This story about how to make a textured sheet with bench scrap appeared in Rock & Gem magazine. Click here to subscribe. Story and photos by Christine Dhein.


