
By Russ Kaniuth
Labradorite was first discovered on Paul’s Island (Paul Island, Isle of Paul) in Labrador, Canada, which is its namesake. Although discovered in Canada, this mineral can be found in several other places throughout Scandinavia.
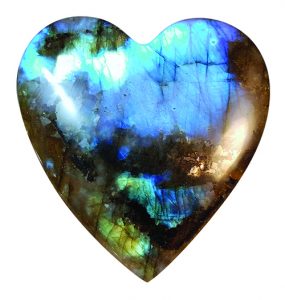
Labradorite is a feldspar with a very unique iridescent schiller effect, with a wide range of colors ranging from blue, green, red, orange and yellow, giving it an outstanding play of color known as labradorescence.
Colors Draw Attention
Labradorite is closely related to other feldspar materials with similar schiller effects such as spectrolite, moonstone, larvikite, and even sunstone. However, labradorite has become one of the most well known and well-used stone in lapidary due to its spectacular display of colors.
Buying labradorite can be tricky. Though it’s simple to find in the marketplace, it can be very difficult to choose a rough stone just by its outer appearance. Even when you can see color flashes on the outside, it doesn’t mean it will continually run through the entire stone. In fact, most of the time the color plains will constantly change direction, making it a very difficult stone to slab. Labradorite can be found in large size pieces, but unless you really know what you are looking for,
 I would highly suggest buying several smaller size chunks, allowing you the freedom to hand cut on a smaller size trim saw.
By having the ability to hand cut, you have a better chance of chasing the color flashes as they continue to change direction.
The first thing to do before cutting slabs is wet your material and hold it vertically with a light source behind you. Continue to rotate the stone in every direction until you find the area that gives you the best color flash display, and that’s where you start to cut your first slab from. With each cut, you will see if the color flash has run its course or not. You might be able to cut a few slabs continuing in that direction, or the color may have dithered out and you will once again have to put it up to the light to determine the direction.
Rotate the Slab To Find ‘Flash’
Once you have your slabs cut and you are ready to design your preforms, its time to go back to the light source once again. Hold your slab vertically and continue to rotate it until you see the best flash. Visualize it as if it were a pendant worn by someone standing in front of you. Once you see the flash, mark the areas with the desired design of cabs you wish to cut, and you’re ready to bring it back to the trim saw and cut.
Slabs should be no more than 1/4” thick, because once you start to grind your cabs, the higher the dome, the more chance you’ll grind some of the flash away and end up with a semi-translucent grey area. With that in mind, be careful you don’t cut the slabs too thick. Plus, keep your cab domes medium to low height for optimal flash effects.
Cabbing labradorite is fairly easy, treat it as you would any jasper. Start at the 80 grit and work your way across all the wheels. It cuts nice and evenly and is fairly easy to remove scratches along the way. However, once you finish up, usually on the 14k grit wheel, it will still have a semi-gloss luster finish.This is one of those stones that really benefits from polishing with cerium oxide on a leather wheel and buffing it out to get that nice shiny mirror polish. Be sure when you do, to go in slow stages and continue to check the cab and be sure not to overheat it, or it might start to crack.
Once you are finished, have a damp towel handy to wipe off any excess polishing compounds, and you should have a beautiful mirror polished labradorite cab just bursting with color!
Author: Russ Kaniuth
 Is the owner of Sunset Ridge Lapidary Arts and the cofounder of the Cabs and Slabs Facebook group.
View more of his work at www.sunsetridgelapidary.com.


