
By Bob Rush
In my previous columns about the wax pen and flexible wax that I use, I have focused on just using the flexible wax for the projects. This post will focus on how to use a combination of two different types of wax. Though you can make multiple types of wax patterns exclusively with the flexible wax it has limitations on how it can be used.
Understanding Different Types of Wax
If your design calls for large flat surfaces, making them flat with the wax pen and flexible wax just isn’t feasible. In this month’s column and project, we’ll combine the use of flat sheets of wax with flexible wax to make the base and bezel walls for the stone. The inspiration for this project is a ring I made about 40 years ago. I chose it because it incorporates the use of sheet wax, flexible wax and a wax pen tip found in a kit, to texture the sheet wax.
Preparing the Subject of Your Wax Work
I made a cabochon from carnelian for this project. I started by making a paper pattern for the ring base that was the shape and length I needed to fit the cab. I placed it under a pink wax sheet measuring 1.5mm and used an Xacto knife to cut. I wrapped aluminum foil around a large dowel that was the same diameter as the ring I desired. I wrapped the wax pattern around the dowel and sealed the seam on the back of the wax with the wax pen.
Wax-Work Process
- With the wax model mounted on the foil-covered dowel, I placed the stone where I wanted it to appear upon completion. I placed double-sided clear tape
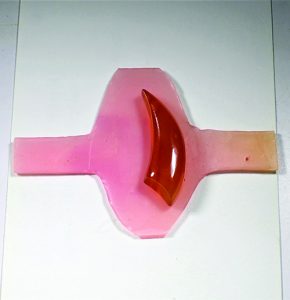
The shape of the wax pattern depends on the size of the added stone.
ALL photos by Bob Rushon the back of the stone because it wasn’t staying in one place.
- Then I coated the stone with a noticeably light layer of mold release to keep the added wax from sticking to it. The tape on the back of the stone held it in place as I started the build up of the wax bezel around the stone.
- I drew multiple rows of flexible wax under the edge of the stone and up to about halfway on the girdle of the stone.
- When this process was complete, I used a dental tool with a small flat tip to pry the bezel wax away from the stone.
- Then I removed the stone by poking it out of the bezel through the wax sheet beneath.
Because a wax model shrinks during the casting process, I used an Xacto knife to trim about 1/16-inch from inside the bezel all the way around and checked the fit of the stone. It must fit easily into the cavity. Next I trimmed the sheet wax from under the stone, leaving a 1/16-inch shelf for the stone to sit.
Assessing the Results
I used the wax pen to add some of the wax sheet material to blend between the bottom of the bezel and the wax sheet beneath. I wanted to texture the surface of the sheet wax around the bezel and down the sides of the band. Additionally, you can modify one of the extra brass tips in the kit to any random shape by grinding or filing it to suit your needs. Because the wax sheet melts at a very low temperature you must dial the thermostat back significantly.
Testing Tip: Use one of the sheet wax pieces to experiment with texturing before trying to texture the wax ring.
The final step in this process is to add a design over the textured surface with the flexible wax. Again, this will be up to your imagination to develop.
Author: Bob Rush
 Bob Rush has worked in lapidary since 1958 and metal work and jewelry since 1972.
He teaches at clubs and Modesto Junior College. Contact him at rocksbob@sbcglobal.net.


