By Bob Rush
In my two most recent columns, I discussed the process of using flexible wax and a homemade wax pen to draw the shapes of a wax model used in casting a jewelry object. Fabricating this model is only possible due to the formulation of the wax. The essential characteristic of this wax is its ability to melt and flow while maintaining a durable shape that is controlled by the temperature of the wax pen and the formula of the wax.
The Right Wax for the Project
I find that waxes often used to build up models, to create the desired shape are difficult to control because they don’t have the viscosity and strength to allow control of their shape as you work with them. For instance, if you try to draw a prong onto a stone, they flatten out and lack any strength or flexibility. As you try to pull them away from the stone so you can remove it, they quickly break off. To me, this is frustrating.
In the past, I was able to procure a homemade wax that would solve this problem and I used it for many years until my source disappeared. Because I couldn’t find a duplicate wax on the market, I was desperate to find a means of duplicating this wax. One day when my wife was using a hot melt glue gun on one of her projects, the smell of the hot wax seemed familiar. I quickly remembered where I had encountered that odor, and it was when I was using the homemade buildup wax!
It quickly dawned on me that I should devise a formula based on these hot melt glue sticks. I tried several base waxes and mixtures and finally settled on a mixture of a common injection wax and the hot melt glue sticks.
DIY Wax Recipe and Techniques
My formula is using Rio Grande’s red injection wax #700213 and the larger clear hot melt glue sticks. I prefer the clear .44” diameter by 10” long pieces. I purchased mine at a major department store, but most craft stores should carry them. The smaller shorter glue sticks will also work.
when it cools down.
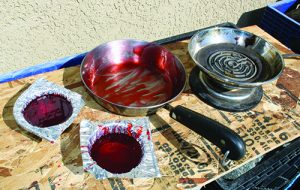
I use an old small coffee pot heater and a small cooking pan that I got at a secondhand store to melt the wax. Because the wax and hot melt glue sticks give off some odor and a small bit of smoke, it is best to melt the mixture outside. Begin by weighing equal amounts of the injection wax pellets and short pieces of the glue sticks. One-and-a-half ounces of each component is sufficient. I use a pair of pruning cutters to cut the glue sticks into ½” long pieces. After the mixture is melted, I pour half of the mixture into two 2-1/2” diameter aluminum muffin pan wells. Spray the pan with a very light coat of silicone spray to keep the mixture from sticking in the wells.
Before starting to melt the mixture, don an apron, a long-sleeved shirt, heavy gloves, and a respiratory mask suitable for smoke and odors. Stir the components with a 6-inch long wood tongue depressor as it begins to heat.
Because the wax melts at a lower temperature, you need to continuously and thoroughly stir the mixture until both components are very thoroughly melted and blended. Turn off the heat and carefully pour the molten mixture into the two muffin pan wells. Leave them to cool for about 15 minutes. Remove them from the wells, and you are ready to put them to use. They will be about one-quarter inch thick.


