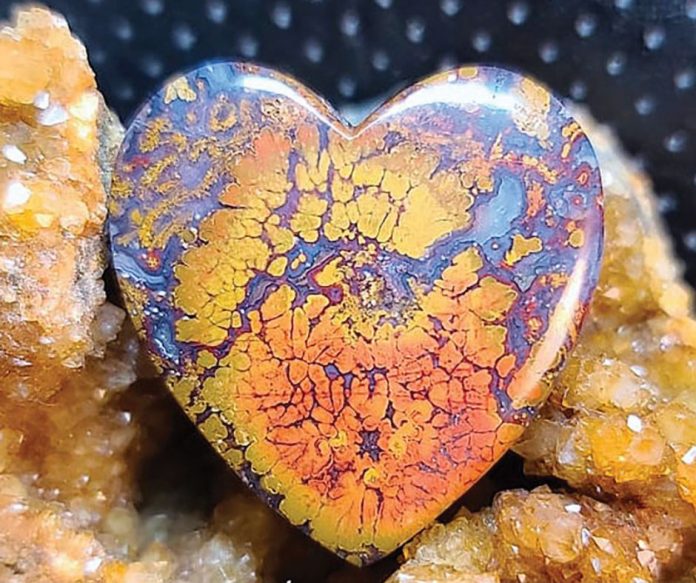
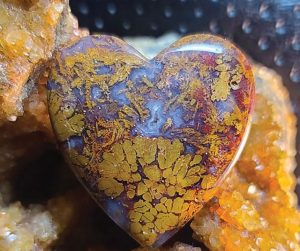
Bloody Basin Plume agate is named after the Bloody Basin Road in Arizona. It’s known for fiery yellow, orange and red colors with billowy plumes and moss patterns.
The Bloody Basin Road is a long road off the beaten path running through Yavapai County in the Tonto National Forest. It got its name from an event in March 1873, where the U.S. Army had a confrontation with several Apaches, who lost their lives in the attack.
Where to Find Bloody Basin Plume Agate
Bloody Basin Plume agate has been found at various sites there. This material is well known for its various fiery colorations of yellow, orange and red with varying patterns of billowing plumes to moss. Though this material is getting scarce, it still can be found in the marketplace at shows and online sales.
How to Pick Bloody Basin Plume Agate Rough
Picking out rough isn’t difficult. Usually, the raw material will show its patterns when the stone is wet. This material can also tend to be a bit vuggy. It’s easy to work around vugs or work them into your cabochon designs. Most lapidaries seek out the plume agate, but the moss can be quite beautiful as well because it’s full of vibrant color.
Slabbing the Material
Before you start slabbing this material, look for the orientation of the plume going from south to north. This is the direction you want to show so that your slabs reveal the plume growth patterns. No two cuts are ever the same, the patterns are ever-changing throughout the stone.
Once your slabs are cut, and you see desirable patterns you want to cut, then take the time to examine the material for the pitting. Either stabilize the slabs to fill them in or continue to trim out your preforms keeping the material’s natural integrity. The pits are essentially cosmetic and will not affect the stability of the stone. It’s a matter of choice.
Cutting & Finishing
 Once your slabs are cut, and you marked your designs to trim out the preforms, the cabbing process is fairly easy. The agate is about a 6.5 on the Moh’s scale. You’ll need to start on a course 80 grit steel wheel to shape and dome the cabs. From here, I like to use a 60-grit soft resin wheel to quickly smooth the top and remove any flat spots and deep scratches. From this point, move onto either a 140 or 220 soft resin wheel. If your setup only has a 220 steel wheel, this is fine. You will just have to spend a little extra time on the 280 soft resin wheel removing scratches.
Once you’ve reached the 280, this is where you need to take your time and continually dry the cab off in the process to examine for any residual scratches or open pits. The pits are usually very small or micro. If you want a smooth surface cab and you have stabilized your material ahead of time, this is where you want to stop and examine if the epoxy has soaked in enough.
If new pits have revealed themselves, fill them in now. Move on to the 600-grit to, at least, the 14k grit wheel. This should yield a beautifully polished cab. If you desire to gain a little extra mirror polish, you can either use cerium oxide on a damp leather buff, or Zam polishing compound with a polishing Dremel bit.
This What to Cut column about Bloody Basin plume agate varieties previously appeared in Rock & Gem magazine. Click here to subscribe. Story by Russ Kaniuth.


