
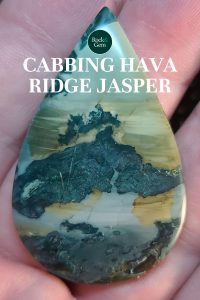
Hava Ridge jasper comes out of the southeast corner of Oregon, found by Nik Taylor in the fall of 2021. This jasper is a beautiful mix of blue-green porcelain jasper with fractal patterns mixed with opalite. This material has a lot of characteristics of various other jaspers from that region, such as Blue Mountain, Willow Creek, Whiskey Creek, and Gary Green Jasper. Its unique colors and patterns with a mixture of opal make this material stand out. There is a lot to be found in each cut you make, whether it’s abstract or picturesque.
Finding Hava Ridge Jasper
This material isn’t heavily available in the market as it’s a very new find but you can buy it directly from Nik on the Hava Ridge Jasper Facebook page. Each chunk of rough will vary in colors and patterns. If there are certain colors you are looking for, buying slabs might be the way to go. If you want a good assortment, I would suggest buying a few pieces of rough and experience slabbing this material yourself.
Starting to Slab
As you begin the slabbing process, this material usually doesn’t have much of a rind, so it’s best just to wash it off and pick which side you want to cut from first. As with some materials, there is a direction you want to cut to show the desired patterns, but with Hava Ridge, you can start at any angle and achieve nice results. With many of the rough pieces I have slabbed, after cutting the first end piece off, I usually choose to continue in that direction, or if it’s not the desired pattern, I will turn it and cut from another side.
Once all your slabs are cut and you are preparing your preforms, just note that Hava Ridge is a hard and very solid jasper, but it tends to have micro pits in it. These pits can be worked around, or even worked into your finished cabs, but if you want a flawless finish, you can stabilize or fill the surface area with epoxy before the cabbing process.
As with most porcelain jaspers, when shaping the preforms on the course 80 grit steel wheel, the back edge likes to chip on the edge. This will have to be addressed once you move on to the 280-grit stage and smooth the outer edge.
Cabbing Hava Ridge Jasper
Cabbing Hava Ridge is fairly easy, I shape and dome on the 80 grit steel wheel, and like to move on to the 60-soft resin wheel to quickly remove the deep scratches and flat spots. If you don’t use 60 grit, this can also be done with your 220-grit steel wheel, it will just take a bit longer. From there, you can go right to your 280 soft resin wheel to smooth 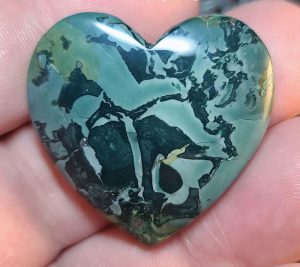 everything out and make sure there are no scratches beyond this point.
Stopping periodically and drying it off will help find any remaining scratches.
Many times it can be hard to see them on darker materials and especially when they are wet. A trick you can use is to dry the cab off, find the scratches and mark them with a Sharpie pen. The ink will sink into the scratch, and as you continue to grind, you should grind the ink right off. It should be ready to move onto the 600-grit wheel to start the polishing stages.
To finish off your cab, work your way up from the 1200 to 14,000 grit wheels and this will yield a beautifully polished cab. If you’d like to take it a step further to gain more of a mirror polish, aluminum oxide on a leather buff, or Zam on a felt tip Dremel works wonders!
This story about Hava Ridge jasper appeared in Rock & Gem magazine. Click here to subscribe. Story by Russ Kaniuth.


