
By Bob Rush
Often, as I am searching my mind for the next project, I get stuck on a certain image that requires a unique feature that is difficult to find in a lapidary material. As usual, I fall back on my old faithful stock of Brazilian agate. This material is plentiful in larger sizes, with various pat-terns, colors, and the absence of pits, vugs, and fractures. As I’m slabbing, I look for the potential images and patterns that I think would make an unusual cab. Sometimes, I unconsciously set aside those patterns that especially intrigue me so if, at a later date, with a bit of searching, I can find them.
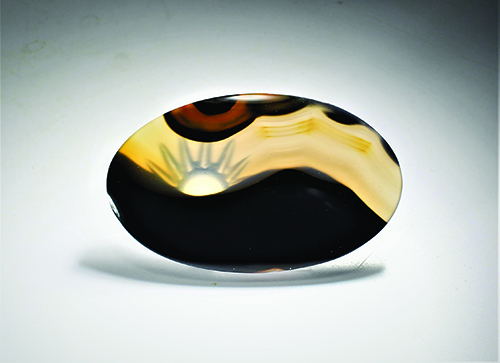
For this month’s project, I wanted a piece I could carve an image of a sun rising (or setting) behind a mountain. I remember purposefully setting aside three small slabs that had the potential for this project. I even remembered where I should look for them, so they were some-what quickly found. The main criteria for this project: the piece must have a rather translucent area above the background so the pattern would show through to the front. I also wanted the background dense enough that it blocks the bottom of the carved area. I had the option of having nothing else in the “sky” on two of the slabs, but on the third, there was a “cloud” that I could position in the image, so I chose it for this project.
All three slabs were a bit thicker than I wanted at one-quarter inch thick. This fact required me to carve the image deeper to make it show through the translucent area. The sun is carved to within 2mm of the front. I used a special caliper to measure this depth. I had to ensure the sun image was located correctly and of the right size for the space available on the slab. I also wanted the sun image to be about halfway above the top of the hill horizon. Once I had it located, I started the hole with a small one-eighth inch diamond bur.
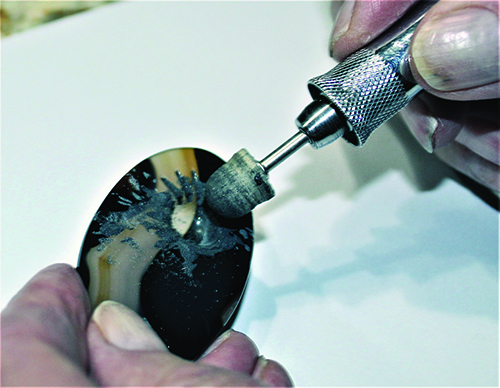
Drilling Tip: You have to tilt the bit in on its side to drill with it in this circumstance. If you try to drill with it vertically, it is a slow process because the center of the bit is just spinning in one place and not removing much material. Tilting it on its side means there is a constant spinning surface doing the drilling. Before finishing the hole, you need to tip it vertically and move it about to ensure the hole is perfectly round.
I drilled the hole with a one-half inch diamond ball bur to within 2mm from the front of the cab. I followed this by cutting the sun’s rays with a one-half inch diamond “V” bur. In the last steps, I finished the work by sanding the hole with 220 and 600 grit tumbling media utilizing a soft wood dowel mounted on a screw mandrel. I shaped this with a file to match the hole. I sanded the rays with a one-half inch wood dowel shaped into a V and the same 220 and 600 grit media.
The polishing was done with Rapid Polish and appropriately shaped wood dowels to finish the project. The sun came out perfectly in size and location, producing an outcome with which I was pleased.
Author: Bob Rush
 Bob Rush has worked in lapidary since 1958 and metal work and jewelry since 1972.
He teaches at clubs and Modesto Junior College. Contact him at rocksbob@sbcglobal.net.
If you enjoyed what you’ve read here we invite you to consider signing up for the FREE Rock & Gem weekly newsletter. Learn more>>>
In addition, we invite you to consider subscribing to Rock & Gem magazine. The cost for a one-year U.S. subscription (12 issues) is $29.95. Learn more >>>


