
By Bob Rush
In a previous article I discussed how to select, orient and cut a cab out of Black Turkish Stick Agate. In this month’s article I will show in detail how I will be fabricating a mounting out of stone for the cab. I decided to make the mounting out of a pure white agate slab derived from a large Polka Dot Agate boulder. A few years ago when we went to the Madras Pow Wow we made a trip to the Polka Dot Agate mine a few miles away.
After picking through their piles of agate we selected some pieces that exhibited the typical polka dot patterns as well as a large piece that had an area that was pure white. At that time I didn’t have in mind any particular use for the white area. I did use some small pieces in the past when I made some assembled cabs with the white as a bottom layer.
Pendant Pattern
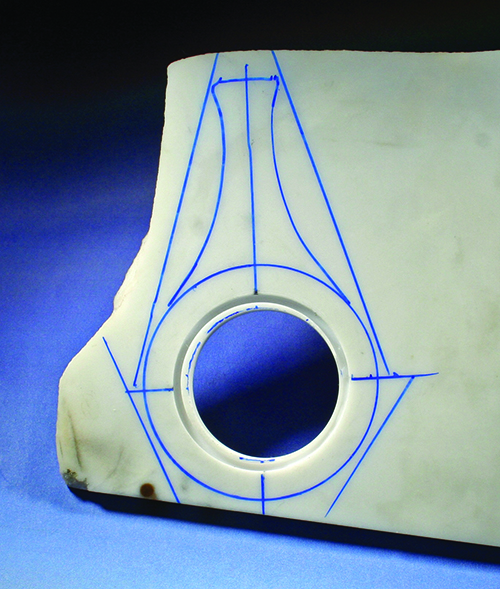
Because the cab is rather large the corresponding pendant piece will end up being large, also. I previously had made a black pendant from Basanite that had a shape similar to what this one will be. I selected a totally white slab. I drew the pendant pattern on the slab including the approximate location for the cab. I wanted to locate and drill the hole before finalizing the shape of the mounting because I find it difficult to accurately locate the hole.
I drill with the piece sitting on a 1/4” piece of wood in an aluminum pie tin with enough water to just cover the piece. As it is drilling the water gets cloudy rather quickly and this obscures the location of the hole.
Drilling Driven by Diameter
The cab diameter is 41mm so I chose a core drill slightly smaller at 37mm. This will allow me to carefully grind it to fit the cab. I wanted the step where the cab was to sit on to be the same height as the top of the stone’s girdle. The height of the girdle is 2.4mm so as I was slowly drilling the hole I very frequently stopped to check the depth of the hole. After I reached this depth I drilled the inner hole all the way through with a 32mm core drill. I didn’t get it exactly centered with the first partially drilled hole but this not a problem because it will be ground to its final shape.
Next I sketched the final shape on the piece while ensuring the mounting hole was centered. I ground the shape of the piece on my 8” diamond wheel. Where I couldn’t reach the inner curves I used 1” silicon carbide Mizzy wheels run dry.
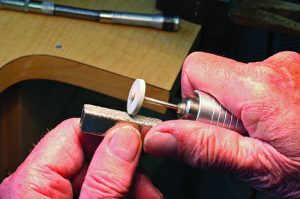
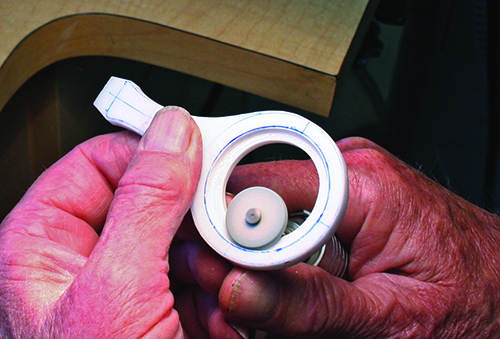
The next step was to grind the larger hole step to fit the cab. I used a 1” Mizzy wheel that was ground flat on a diamond wheel dresser. This was to ensure the step for the cab had a sharp step. As I reached up through the large hole to access the step I held the side of the wheel slightly above the step surface. I carefully ground the outer diameter until the cab fit into the pendant.
The finished piece will have three small graduated cabs of Chrysoprase embedded above the center cab. The next submission will show the steps taken to finish the pendant.
Author: Bob Rush
 A professional within the lapidary industry since 1958 and metal work and jewelry since 1972.
He teaches at clubs and at Camp Paradise.


