
Over the years I have become almost obsessed with working obsidian. It is rather abundant and the varieties that are possible are numerous. Most of the collecting sites are still producing examples of the classic colors and patterns in reasonable sizes. The most important thing is knowing and understanding how to properly orient the material to expose the particular pattern or effect that you are looking for.
Mahogany and Memories in Glass Buttes
It has been many years since I went to Glass Buttes with my dad to collect material at this site. We did get some of the Midnight Lace material as well as the mahogany material.
Initially, I worked mostly on the Midnight Lace pieces and then my dad and I went to the Davis Creek site for the rainbow material that this site is famous for. I have spent many hours with the rainbow material making cabs, carvings and polishing specimens and it started to get too routine for me. It was time to move on to some other material. Lately, I have redirected my interest back to the mahogany material.
Identifying pieces to cut has consumed some of my time taking test cuts to evaluate the pieces.
Preferred and Prevalent Patterns
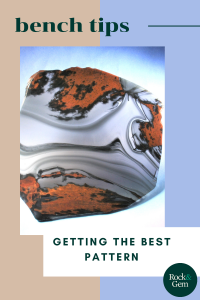
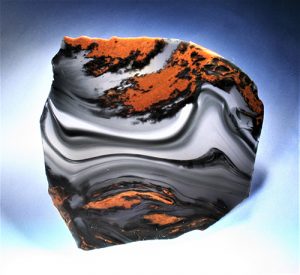
The patterns that I prefer are swirls of black and gray with red mahogany accent areas. In a lot of this material the red and sometimes orange mahogany becomes the most prevalent color of the piece leaving very little of the remaining areas for the black type of obsidian. A quick look at the exterior easily reveals the pervasive red/orange areas so the piece can be quickly excluded from the possibility of the desired pattern.
I generally like to work fist-sized pieces or sometimes slightly larger. As you roll the piece around you can evaluate how much of the piece is mahogany and how much is black.
I have found that the best pattern comes from pieces that are mostly black with random areas of red mahogany. The red areas should constitute not more than one quarter of the total part of the piece. On some pieces you can detect swirly shallow lines on the surface of black areas. Often the outer surface of this material has a thin coating of white material that obscures these patterns within. I take a stiff metal bristle brush and vigorously brush the piece. Most of this coating comes off with a moderate amount of effort. This should make any swirl grooves obvious. The swirly material is uncommon but is a definite indicator of there being swirly patterns within the piece.
Most of the time there is no indication of any swirly or wavy patterns in the black areas of the piece. It just looks black and no amount of moving the piece around in the sun will reveal anything but black.
Orientation Aids in Pattern Presentation
I orient the piece in my saw so that I’m cutting parallel to the largest black side of the piece with the red areas on the sides or the back. After cutting off the end piece I make the next cut 1/8” thick. If the pattern is quite light you can cut the slabs slightly thicker.
The pattern changes quickly from one slab to the next. You can see the changes within the piece merely two cuts further into the rock. If you are making a cab of this thinner material, you may need to add a layer of clear glass behind it to make it durable enough for a cab. You can also add a layer of synthetic quartz on the top. One characteristic of this material is the mahogany areas are difficult to get the same quality of polish that you get in the black areas.
Working this material will certainly give you a lot of surprises and pleasure.
These Bench Tips about obsidian previously appeared in Rock & Gem magazine. Click here to subscribe! Story by Bob Rush.


