
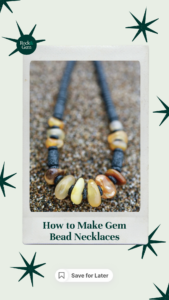
Beaded necklaces are a timeless way to showcase gemstones, express personal style, and create unique wearable art. Whether you’re stringing purchased beads or crafting your own from lapidary stones, understanding the materials, tools, and techniques is key to achieving beautiful results. In this guide, you’ll learn the essentials—from selecting cords and findings to drilling, shaping, and polishing beads—so you can bring your necklace visions to life with confidence and creativity.
Beaded Necklaces: Key Takeaways
- Beaded necklaces can be made with purchased or handmade gemstone beads.
- Choosing the right cord and findings affects durability and style.
- Diamond drill bits and water are essential for drilling gemstone beads.
- Always drill holes before shaping beads to keep them centered.
- Tumbling is an efficient way to polish multiple beads evenly.
- Creative patterns and personal details make each necklace unique.
Buy or Make Your Own Beads
To make gemstone beaded necklaces or other gemstone wearables, making your own beads is not required. That is solely for lapidarists and their desire to make something uniquely their own. You can purchase gemstone beads, pendants, and cabochons in a wide array of materials online or from your favorite rock shop or craft store. These are ready to be strung up and worn.
Necklace Cordings & Findings
Choosing the Right Cord for Beaded Necklaces
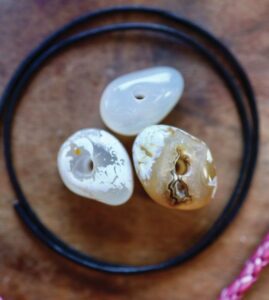
Leather cord is popular for lapidary beads. I prefer Nappa Bolo braided leather, though round or braided leather works as well and can cost less. Cotton cord offers more color options, but it may shrink and affect the final necklace length. Metal chains are also an option, depending on your style.
One of the main factors to consider when choosing cordage is the diameter of the cord. This can work one of two ways. Your cord’s thickness can be one size smaller than the hole in your beads or your bead’s hole size can be one size bigger than your available cordage. This is noteworthy when buying diamond drill bits for making your own beads and/or when buying beads directly.
Selecting Clasps & Findings
Consider clasp style and cord diameter before ordering findings. Most clasps are glue-in style and work with liquid super glue—avoid gel glues for easier application. Magnetic clasps are my favorite; they’re kid- and elder-friendly and offer a breakaway feature if pulled, preventing accidents.
Ideas for Making Beaded Necklaces
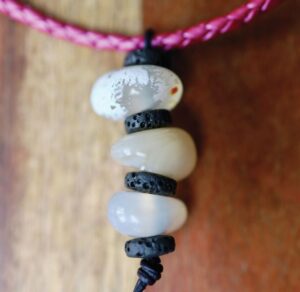
Let your beads tell a story. Consider gemstones that transmit positive energy, represent a theme, or reflect personal significance. For gifts, incorporate birthstones, astrological stones, or symbolic numbers. For example, my “3-6-3” pattern reflects the 363-mile Oregon Coast, using agate beads and lava rock spacers.
I always try to find a way to incorporate an easter egg into my work whenever possible, as it adds an extra layer of authenticity and detail that usually only the wearer is aware of. I once made a necklace for my daughter for Valentine’s Day that featured two heart-shaped rose quartz beads followed by 14 pink rhodonite beads and black obsidian as spacers. The pattern of 2/14 was the date of the occasion it was made to represent.
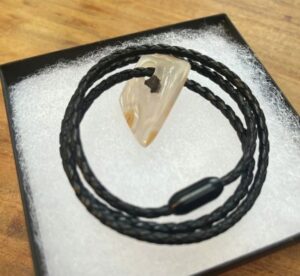
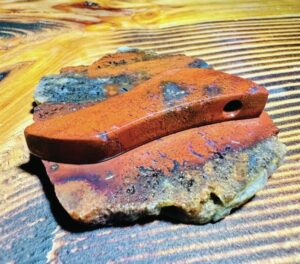
Create pendants with beads by threading a smaller cord around your necklace and through the beads. My 3-stone pendant method uses 1mm leather cord with spacer beads to separate gemstones. You can mix purchased and homemade beads for a unique design. Oftentimes, I buy my lava rock spacers but make my own agate beads.
Making Gem Beads at Home
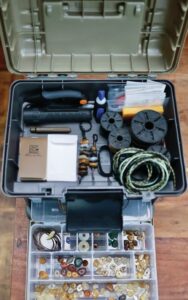
Your drill will be your primary tool in making lapidary gem beads. Based on the hole size you want to make, either a drill press or a rotary tool may be the best to accomplish the task at hand. In my experience, drill presses will likely be better at cutting larger diameter holes and drilling the cleanest and straightest holes.
While rotary tools like a Dremel —I use a cordless smart version model 8260 — will likely be better at cutting smaller diameter holes. Since these tools are handheld, the holes may not be the cleanest and straightest. There is a Dremel Drill Press WorkStation, which allows the user to have a more hands-free approach and achieve cleaner cuts.
There are many variations, brands and styles of gem drills available, so choosing the right one is important for anyone interested in trying their hand at crafting their own beads and pendants.
Drilling Gems for Beaded Necklaces
Choosing the Right Drill Bit
Diamond bits are essential for gem-grade materials. Cutter Choice core bits work well in various sizes, with 2.5mm–11mm and 6.5mm fitting most rotary tools and drill presses. I typically use 3mm-4mm and 6.5mm with 3/32” shanks for my purposes. This is what is required for most rotary tools and can fit into most chucks on drill presses as well.
Preparing Your Stone
Water is critical to reduce debris, dust, and heat. When drilling through gem materials, a lot of friction is created and when drill bits heat up they are susceptible to premature wear and breakage. I use a Flex Cooler, which is versatile and a great addition to any drilling or lapidary application. It can be clamped onto many different surfaces and works by directing a controlled stream of water from a small pump in a 5-gallon bucket up a tube to an articulating hose aimed right where you need it.
Secure your stone in a jewelry vise for safety and precision, ensuring it won’t move during drilling. In my experience, an aluminum jewelry vise works well. It has four points of contact to hold your stone, can be stabilized by being bolted or suctioned down, and is made of materials that will not rust or corrode when used with water.
Drilling Technique & Tips
Use medium pressure and steady water flow. Keep in mind that when you are drilling, a blowout can and will occur on the backside of the stone. Approach the bottom of the hole slowly using slightly lighter pressure to prevent blowout. Sintered diamond burs can bevel edges or clean breakthrough areas, giving a polished finish.
Finishing the Hole
After drilling, inspect and bevel edges as needed. Depending on the style and shape of your bur, they can add a nice finished beveled edge to your bead rather than leaving it plain. A properly drilled hole ensures beads are ready for stringing and avoids frustration in the assembly process.
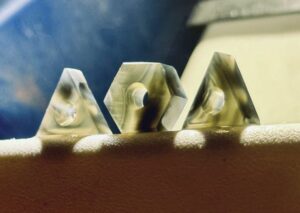
Using Stencils to Form Beads
Planning Your Bead or Pendant
Cut your lapidary slab into half-inch sections. Place a stencil over drilled holes to trace shapes, ensuring holes remain centered. If I am making beads, the holes can be centered better this way. If I am making a pendant, I can make sure it is placed exactly where I want it.
PRO TIP: Never cut the shape before drilling; off-center holes are common if done in reverse.
Cutting the Shape
Use a lapidary slab or trim saw with sintered diamond blades and water. I use Hi-Tech Diamond equipment for the cutting and shaping. Cut close to the stencil outline, then refine on a flat or slant lap machine.
Here, the bead can be tuned up and modified if any imperfections are found. If your slab wasn’t cut perfectly level, then you can press the bead or pendant piece on a diamond lap disk to even it out. You can also grind the edges to the exact shape you stenciled. Squared edges are easier to uniform; rounded or curved edges are more challenging. Bevel outer edges for a polished look. Minor imperfections show your handcrafted work.
Polishing and Finishing Beaded Necklaces
Hand polishing is possible but time-consuming. Tumbling allows multiple beads to polish evenly, including inside drilled holes. This enhances gemstone transparency and consistency.
PRO TIP: If you want to make a few quick gifts or if you’re planning for a gem show, be mindful that some options get the job done faster but require more elbow grease and some require less work but will take much longer to process.
Check symmetry, smoothness, and clarity. Minor tweaks on a lap disk can perfect edges or flatten surfaces. Once polished, beads are ready for stringing into necklaces or pendants.
Frequently Asked Questions About Beaded Necklaces
What is the best cord for beaded necklaces?
Leather cord is a popular choice for durability and style, while cotton offers more color variety. Metal chains can also be used depending on the design.
Do I need to make my own beads for beaded necklaces?
No, you can purchase ready-made gemstone beads. Making your own is optional and typically done by lapidary artists.
What tools are needed to drill gemstone beads?
You’ll need diamond drill bits, a rotary tool or drill press, water for cooling, and a vise to securely hold the stone.
Why is water important when drilling beads?
Water reduces heat, prevents dust, and helps extend the life of your drill bits.
Should you drill or shape beads first?
Always drill holes before shaping beads to ensure the holes remain centered.
What is the easiest way to polish gemstone beads?
Tumbling is the most efficient method for polishing multiple beads while achieving a consistent finish.
Experiment, be patient, and enjoy the process. Your tools and techniques will evolve over time, and the beauty is in the creative journey. Remember, there are no mistakes in art, and each necklace tells a unique story.
Happy crafting!
This story about making beaded necklaces previously appeared in Rock & Gem magazine. Click here to subscribe. Story by Eric Davis.


