
By Russ Kaniuth
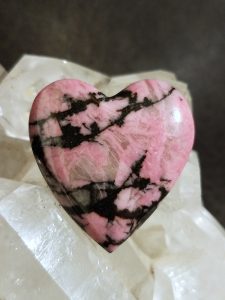
Rhodonite is a relatively common lapidary material and has been for well over a hundred years due to its popular pink colors. It’s found in many areas around the world, and all have varying characteristics and coloring. Rhodonite is a pink manganese silicate, that often has black manganese oxide veins running through it. The coloring can range from a pastel cotton candy pink to a dark rose shade.
At times, it can be mixed with several other colorings such as white, yellow, and brown, which provides more options in cab designs.
Shopping for rhodonite can be a little tricky if you are attempting to buy rough. This material with tarnish black and brown when exposed to the air, so most pieces are difficult to see what you’re getting. Slabs will also tarnish if left out over a period of time. Depending on which locale the rhodonite is from, you can cut rough and have almost 100% usage of the material with the majority displaying all pink coloring, while other locales will have pockets of pink and a great deal of waste in each slab. To get your monies worth, it might be best to buy slabs to see what you’re getting.
Shape and Polish Beautifully
Rhodonite is a harder material that ranges from 5.5 to 6.5 on the Moh’s scale, but it shapes and polishes beautifully. Each Locale has its variances, but my personal favorites are from Northern Nevada and Australia. The two usually have deeper hues of pink, and can be slightly gemmy. While the Nevada material is quite solid like working with jasper, the Australian material is almost sugary like working with a hard Lepidolite.
 Slabbing this material is rather simple, for there is no right or wrong direction to position each stone in the saw. Once your slabs are cut, draw out your patterns and trim off all the excess black manganese to get to your preform shapes.
Since this material is rather hard, it is one you will definitely want to start on a more coarse grit, either a 60 or 80 grit wheel. I tend to shape my edges and start my dome on the 80, but try not to overdo it so that it won’t chip off the back edges of the cabochon. Once my shape is done, I like to move onto a 180 grit steel wheel before moving on to the soft resin wheels, this way I can smooth it out and remove any deep scratches.
Color Comes to Light
At this point, your material will still look grayish pink, lacking color, but pay no attention to that, once you start smoothing it out on the 280 grit wheel, you will see all the color come to life immediately. The trick with this material is to dry completely after the 280 grit, making sure there are no scratches before moving on. Once the material dries, if there are any scratches, they will stand out like a sore thumb!
Upon checking for scratches, and you move onto the 600 grit wheel, it will start to polish fairly easy. I tend to take this up to 14k grit and at this point, it will have a nice glossy finish. However, if you choose to go further, up to 50k grit wheel, you can achieve a tad more of a mirror finish displaying that flashy pink!
Author: Russ Kaniuth
 Is the owner of Sunset Ridge Lapidary Arts and the cofounder of the Cabs and Slabs Facebook group.
View more of his work at www.sunsetridgelapidary.com.


