
By Russ Kaniuth
Making cabochons on a daily basis, I find myself always looking for new materials or new ways to cut the same materials. I like to continue to challenge myself creatively.
For years, there have been many companies or individuals that have created either man-made, reconstituted or composite materials. Combining materials tends to always add an eye-catching flair, but even those tend to get redundant after awhile
Composition Material Challenge
This past month I decided to make a few of my own and challenge myself to create something new in hopes that I can share this knowledge and see if others will attempt their own as well.
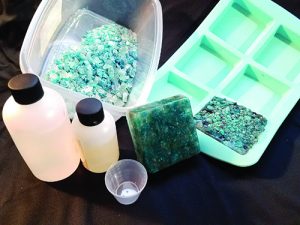
There are so many different ways to make composite materials, and in many cases the cost of equipment is substantial. After researching variations thoroughly, you’ll see there are a few ways to make the material at minimal cost. One method includes using a vacuum chamber, and inserting a small container of your choice of mixed materials and epoxy resin, and vacuuming out all the air to remove the air bubbles and compact the material tightly. While most lapidaries don’t have a vacuum chamber for stabilizing material, I did some trials to discover the most simple way to make composite slabs in order to share these tips with you. I went down to our local hobby shop (Michael’s) and picked up a silicone mold that has 3” x 3” x .05” square sections to use in making single slabs.
When starting out, I used color combinations that I felt were most desired along with saw trimmings that were no longer usable for creating cabs, to crush down and mix together in my composites. Specifically, I tried a couple of different blue combinations that I felt would make good complimentary colors. The first was apatite and amazonite that I mixed with a two-part epoxy. There are many epoxy formulas you can choose from.
Understanding Your Materials
Alumilite is a commonly used brand, but if you chose one of your own, be sure it’s a 24-hour epoxy, most five minute or one-hour epoxy solutions are too soft.
When crushing down material, you can do it the simple way, using a hammer on the concrete, but be sure to place a rag over the material so it doesn’t shoot out in all directions. Crushing down material to size is all in the eye of the beholder, in terms of what size is best. My suggestion is to pick the large size you like best to serve as the focal point, then crush down medium and small size granules. Having a variety of sizes allows there to be as much rock material in the composite as possible, so the visibility of epoxy is minimal.
Next, mix your epoxy thoroughly, and you can add colored dyes at this point if it’s desired. The dies can be easily found online, and most are just mica pigment powders to be added to the epoxy resin before mixing it with a hardener. I usually just mix the epoxy and the stone in a cup that can be tossed afterward. You start by adding a little crushed stone a little at a time and mix well. Keep adding to the mixture, but not to the point that it is overly dry.Then pour it into your silicon mold nearly to the top.
Don’t completely fill the cup, you will need a little space to manipulate the material without having it overflow. Once it’s been poured, use a plastic spoon or knife and continue to pack the material down. Work at it for a few minutes to get the pieces to conjoin together as much as possible, while the remaining glue and air bubbles rise to the top. Once it’s done, let it sit overnight, and the next day the slabs will just pop out of the silicon tray, ready for use.
Utilize UV Light For Hardening
If you have access to a UV light, this will help the drying and
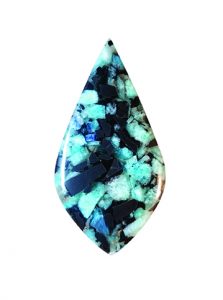
hardening process, but it is not necessary. Once the slab is dry and ready to use, I usually trim the top layer, because it has excess resin and a rough surface. Once it has been trimmed, you can start to draw out shapes. The cabbing process for composite material is no different than any other type of stone, however, you can try various ways to polish. Some end just on the 14k or 50k grit wheel, while with others you may want to use carnauba wax or coat with a thin layer of clear resin.
I hope to see many of you have fun trying something new and making new creations.
Author: Russ Kaniuth
 Is the owner of Sunset Ridge Lapidary Arts and overseer of the Cabs and Slabs Facebook group. View more of his work at www.sunsetridgelapidary.com.


