By Russ Kaniuth
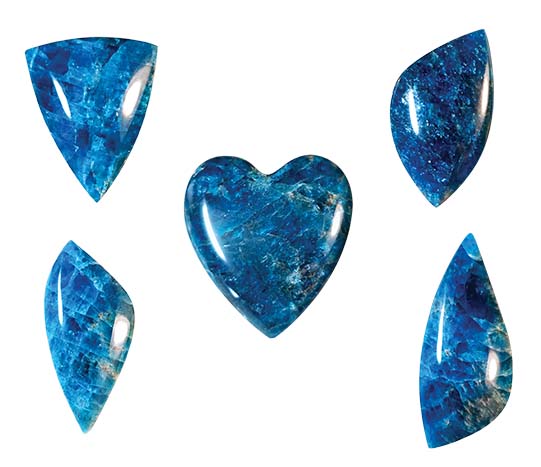
Apatite comes in an array of color variations from all over the world, but the most sought out in lapidary is the blue/blue-green from Madagascar. The fractured vibrant cobalt blue color just catches everyone’s eye! The vivid blue matched up with silver makes a great combination for silversmiths and wire wrappers, and the fractured look gives it that added texture for a pleasing design to work with.
Challenging, But Rewarding Material
This material can be pretty tricky to work with for several reasons, you will have to contend with the natural fracturing of the stone, and it’s rather soft as well, so the odds of the material breaking tends to be greater than normal. With that being said, shopping for this material will have to be done with great caution, seeking out the most solid pieces you can find. I would suggest when buying this material always ask the seller if it has been stabilized.
If you chose to buy natural apatite, always factor in at least an average of $25 a pound to have it stabilized on your own. Another thing to consider when shopping for your material, the lighter the blue usually means the more fracturing inside the stone as the white fracture lines lighten the color and the darker stone usually has larger sections of deep blue to work with. With material like this, I tend to try and buy smaller size pieces rather than the large ones, just in case it happens to be so frail that it falls apart, you won’t lose quite as much of an investment if it is just a smaller piece. The other benefit to buying smaller sized rough is being able to hand cut it on a 10” lapidary saw and have the ability to go slow and not generate as much pressure to keep it from breaking.
Once your slabs are cut and you are ready to start the cabbing process, remember all the above, proceed gingerly and with caution. Stabilized apatite is quite easy to cab and being that it’s so soft, you can easily start your preform shape and doming on the 220. I would highly suggest not starting on anything more coarse, there’s a great chance of it chipping or just breaking apart. You don’t need to do a great deal on the 220 grit wheel, just enough to get its shape started. Don’t worry about scratches or flat spots, the soft resin 280 grit wheel will take all those out in a hurry.
Polish Stages Are Critical
At this stage, use the 280 grit to smooth out your cab and remove any heavy scratches, but you don’t have to be too concerned if you are still seeing those micro swirl marks, the 600 grit will take care of those. Always cab with a lighter touch on the edges, this is where you tend to get blow out’s or large fractures, but you can use a decent about of pressure across the top and back. As you further your way along to the 600 grit wheel, you should notice it’s already looking like it’s completed, just with a slight luster shine.
Most lapidaries will go to a 1200 grit and then either 8k or 14k grit wheel, and this is a perfect spot to complete a nicely finished cab with a mirror polish on it. You can go one step further and polish on a soft resin 50k grit wheel to give it that added shine, but I wouldn’t suggest trying to polish it on a leather wheel with polishing compounds.
Since apatite has fracturing, it will also tend to have small pits and some open areas between fractures. This is where polishing compound would easily fill in those spots and be near impossible to get out after, not to mention the friction will heat up the material too much and cause it to crack and most likely break.
So always try and finish on the wheels with a good source of water running.
Author: Russ Kaniuth
 Is the owner of Sunset Ridge Lapidary Arts and overseer of the Cabs and Slabs Facebook group.
View more of his work at www.sunsetridgelapidary.com.


