
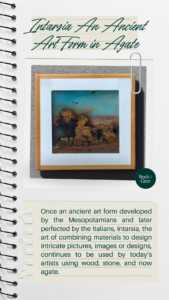
Intarsia is an ancient art in agate that transforms thin slices of gemstones into tiny, intricate scenes. Once developed by the Mesopotamians and perfected during the Italian Renaissance, intarsia continues to inspire modern artists like Eugene Mueller, who crafts miniature landscapes from moss agate, plume agate, and other precious stones.
Intarsia: Definition and Process
Intarsia is defined as the process of cutting material out of a solid body of one material to receive sections of another material to create a surface pattern, scene, or image.
The following are a few terms sometimes used in conjunction with intarsia—each is not only considered an art form on its own but also has played a role in the development of intarsia as we know it today.
Inlay: Embedding pieces of one material into a base material to form a pattern.
Marquetry: Assembling pieces of veneer on a surface to create an image or pattern.
Mosaic: Arranging small colored pieces of hard material like stone, tile or glass to produce a picture or pattern.
Segmentation: Using material cut into various shapes to create a mosaic.
Courtesy Eugene Mueller
Intarsia: From Mesopotamia to the Renaissance
One of the oldest examples of intarsia is a ‘wood’ casket from Mesopotamia dating to 2600 B.C. This example falls under the category of marquetry as the casket was constructed with pieces of ivory set in bitumen, a solid, naturally occurring petroleum-based product.
In seventh-century A.D. Egypt, wooden art using intarsia and inlay was becoming more popular. This art form reached perfection during the Italian Renaissance when it was referred to as pietra dura, or hard stone, a term used for the inlay technique of placing thinly cut and polished stones to create images. The stonework was glued, stone by stone, on its base with such precision that the spaces between each section were almost invisible. These works of art typically featured a stone frame to keep the smaller stones in place.
At the same time, intarsia using wood was becoming popular throughout Italy, France, and Germany. Many churches were decorated with pulpits, altars, and other furnishings produced using this intricate technique.
The main difference between stone and wood intarsia pieces from this time was their size. Because of the difficulty of construction, the stone intarsia usually consisted of small pieces such as lapidary or jewelry, while the wood objects could be large furniture and decorative pieces. Intarsia is still used today by woodworkers and lapidary artists—each tweaking the art form and their technique to make it their own.
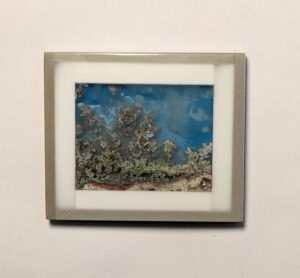
The intarsias produced by Eugene (Gene) Mueller are micro-mini versions of the Renaissance intarsia, made from thinly cut slices of agate and other precious and semi-precious stones, layered to create tiny works of art that measure in millimeters, not inches.
Courtesy Sue Eyre
Eugene Mueller and Modern Intarsia
Gene may be known for his retail store or booths at rock and mineral shows, but he also owns and manages several agate claims in Oregon and Mexico. He has a Master’s degree (MFA) in Fine Arts, specializing in painting and drawing, from the University of Wisconsin—Milwaukee (UW-M).
He became interested in intarsia over 30 years ago, creating nearly 400 miniature intarsias before taking a 15-year break. His early pieces were fairly simple, sometimes only one or two layers. They became more intricate as his technique improved. Each work of art has been thoroughly documented and photographed in volumes of notebooks. In the last three years, Gene has developed a renewed interest in his intarsias, producing more than 22 new pieces and scores of partially completed bits of inspiration.
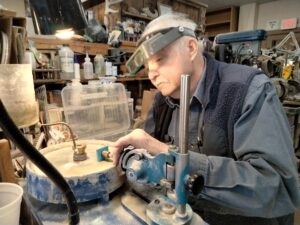
His process is not only difficult but tedious and time-consuming. Each intarsia takes a minimum of 25 lapidary hours. Gene has experienced many failures along the way, as many things can and do go wrong during the process.
Courtesy Sue Eyre
Agates and Stones Used in Intarsia
Gene is always looking for that special ‘scene’ when choosing agates, and according to him, “the more scenic the stone, the more valuable the final piece.”
Montana moss agate is a favorite material because of its consistency and favorable dendrite inclusions. Gene has two additional top picks to use as ‘scenes’ stones:
- Green plume agate from south of Snow Creek in the Wiggins Fork collecting area of Wyoming, because of its beautiful green tree images and clear agate.
- Santa Maria plume agate from Arizona, which often displays multiple layers of ‘scene’ within the same slice. It contains exceptionally clear agate surrounding the plumes that allows the background to show through.
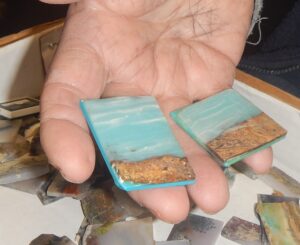
Gene gets inspiration for new intarsias from a box of agate and background slices, previously abandoned intarsias at various stages of completion, as well as an antique cigar box filled with moss agate slices containing small dendrite inclusions. Frames, or borders for these tiny works of art are chosen later in the process from boxes filled with slabs of solid-colored jaspers cut to various thicknesses.
Courtesy Eugene Mueller
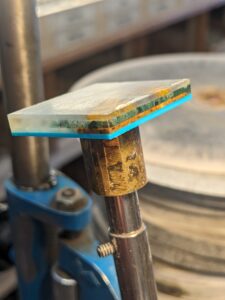
How to Create Agate Intarsia: Step by Step
Gene’s process from start to finish. (See diagram above showing possible layers.)
1. Sorting scenic slices to frame the perfect scene.
Gene starts a new intarsia by sorting through 1mm thick slices of scenic agate. He places his fingers over a slab to frame a possible ‘scene.’ Then he picks out his first background slice, usually Peruvian blue opal, because it often has inclusions that simulate clouds.
2. Using slow-curing epoxy for precision.
Using a slow-curing, resin-based epoxy glue, he affixes the main scene agate to the first background layer and sets it aside to cure.
3. Thinning the agate while preserving the scene.
When the glue is fully cured (about two days), he uses a faceting machine to grind the top agate as thin as possible while always maintaining the optimum scene quality. If an additional background of turquoise is planned, the blue opal layer may also be ground thinner at this time.
4. Adding foreground and background layers for depth.
Gene likes to build the scene forward and backward at this point. He may add a foreground agate to look like trees or bushes to increase the depth of the field. Also, he may add a darker blue sky by adding a layer of turquoise to the back. He glues these layers, lets them cure for two days, and then grinds them to the desired thickness.
5. Enhancing the scene with natural inclusions.
Often, Gene likes to add a bird or two in the sky to add interest and establish a top surface that can be perfectly polished, hiding any imperfections in the scenic slab below.
He finds a fairly clear slice of moss agate with dendrites that resemble birds in flight, glues that slice on top, lets it cure, and then grinds it, being careful not to eliminate the birds.
6. Trimming the intarsia for maximum effect.
Now that all the basic layers have been added, he uses the faceter to trim the intarsia to its final size. He crops the scene, keeping it as large as possible for maximum effect.
7. Choosing complementary stones and layers for framing.
At this point, he decides on one or more colors and stones for a border to complement the scene. Borders can be one, two or three layers of different stone. Each layer is made up of four separate pieces of the same stone.
Gene first glues the right and left sides. When the glue is cured, he grinds the top of the piece flush with the scene before he glues the top and bottom pieces, overlapping the side border pieces.
After the glue is cured, he grinds the top and bottom even with the side edges of the border. This process is repeated for each additional border. Gene has crafted a special clamp tool to hold the pieces in place during this process.
8. Securing the back layer, typically basalt.
The last layer is a slice of dark stone, usually basalt, because it can be cut thin, as a base or back for the entire intarsia, including the borders. Gene glues it in place and again allows it to cure.
9. Refining edges and polishing the top surface.
Now, fully assembled, Gene uses his faceting machine to make final adjustments. He smoothes the edges of the border and base, and grinds the front edge of the borders flush with the top scene agate. This is his last opportunity to make any adjustments to that top agate layer. He usually likes to grind an eight to 10-degree, forward-facing angle on all four sides of the outside border. This angle allows a silversmith to create a setting without covering the border if it is made into a pendant.
Finally, Gene polishes all surfaces, except the back, using a tin oxide polish.
Recognition in Intarsia Art
Gene was awarded an American Gem Trade Association (AGTA) Cutting Edge Award in 1992 for one of his pieces, constructed from 16 individual pieces consisting of Wiggins Fork moss agate, Sante Fe plume agate, turquoise, and black basalt with a border of black onyx and magnesite.
Modern Intarsia and Lapidary Art
Gene says there are numerous lapidary artists currently producing varied styles of intarsias. “Today’s lapidary arts community provides many opportunities through workshops, online learning and even schools like the William Holland School of Lapidary Arts in Georgia, for aspiring artists to learn variations of this unique art form.”
This story about intarsia was written for Rock & Gem magazine. Click here to subscribe. Story by Sue Eyre


