When you’re rock collecting, it’s good to know how to photograph rocks, especially small objects. Learn what equipment is needed plus lighting and set up basics.
As with Occam’s razor which says that of two explanations the simpler one is more likely to be correct, for small mineralogical photography, it means, “do not make things more difficult than necessary.”
Photography Goals
Two concepts to always consider are why you are taking this particular photograph and how are you going to use it. Then you can choose the tools and techniques that are appropriate to achieve that goal. For example, a photo you want for reproduction in a magazine may require different tools and techniques than the one you intend to use on eBay. Pre-visualization, a technique used by Ansel Adams, can help. Pre-visualization means you form an image in your mind or sketched on paper of how you want your photo to appear.
Camera Equipment Needed
Camera brands vary by personal preference, however, having two generic types is recommended —a digital single-lens reflex (DSLR) with a macro lens and a higher-end, point and shoot with macro capabilities. For example, the DSLR I use is a Nikon D70 with a 105 mm micro Nikkor lens and my point-and-shoot is a Nikon Coolpix 900. The Coolpix 900 allows me to photograph objects down to 25 mm (one inch) when set to macro mode. The Nikon D70 with the 105 mm micro Nikkor lens allows me to fill the frame with an object 20 mm in size. If I incorporate a 60 mm extension tube with the micro Nikkor lens, I can photograph an object 5 mm (0.2 inches) in size.
Smartphones
There are pictures of geodes and minerals taken with smartphones on websites that look good. Looking good on the internet is not the same as being useful for publication or high-resolution prints. In any case, most of the principles of photography using smartphones as a camera still apply.
Photography Accessories
Using a tripod becomes more critical when doing close-up photography and it is recommended. When using a camera with an anti-vibration function, you must turn off the anti-vibration function when you’re using a tripod because the vibration reduction function looks for vibrations in your camera. If it does not detect any, it will generate vibrations resulting in camera shake.
The Rule of Thirds
The rule of thirds is a compositional guideline where you imagine your frame divided up into thirds both horizontally and vertically so there’s a virtual overlaid grid on it. The most important aspects of your image should be placed at the intersection of these gridlines.
Background Basics
Backgrounds are subject to personal preference, but I recommend three basic backgrounds —black, gray and white heavy cotton pieces that are three by five feet. Avoid cotton fabric that has a sheen and use a fabric with a dull surface to avoid reflections that detract from the object you are photographing. Try to arrange your background cloth so it appears seamless in the photo.
Using Light
Two critical aspects of light are quantity and quality. Just the right quantity is needed to determine correct exposure and the light’s quality determines the color balance. Modern DSLRs and point-and-shoot cameras have accurate light metering systems, so correct exposures are easy to obtain.
Obtaining the correct color balance, or white balance, can be more difficult because different light sources vary in the color spectrum. White balance in digital photography means adjusting colors so the image looks like it would in daylight. The good news is that adjusting the white balance is easy and can be done in your camera by using post-processing software.
Most cameras have the option to adjust white balance. Typical settings include auto, manual, daylight, incandescent and fluorescent. Auto is the default white balance setting I use most. The camera automatically sets the white balance depending on the light source. If you feel the color balance is not right in your final image, you can always adjust the color balance of your image with editing software.
Composition
 Composition is how the objects in a photo are arranged. A composition can be made up of many different elements, or only a few. It’s how the photographer puts those elements within a frame that help a photograph become more or less interesting to the viewer. When you’re thinking about how to take good photos of small objects, you’ll want to center the object and have it fill around three-quarters of the frame. In some instances where a mineral might be on top of the matrix and off to the side, the rule of thirds should be applied.
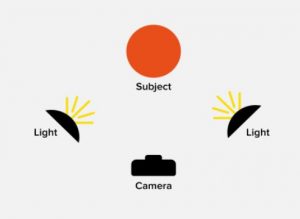
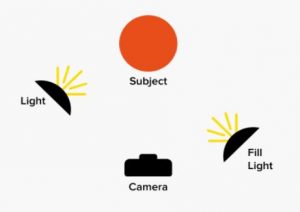
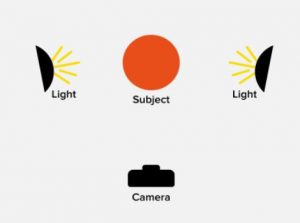
Light Placement
Light placement determines how your image appears with shadows, highlights, and texture. I use three different setups depending on what I want to emphasize.
I call these three lighting techniques basic, portrait and skim. The lights I use the most are 200 Lumen LED Super Bright Flip Lights (PSWITCH-12/48) available at Harbor Freight. They come with magnets and velcro on the back for easy attachment to a homemade stand. An electronic flash is another light source, but it can become more complicated depending on how your camera determines exposure using this light source.
Another problem is that you would still want to use multiple lighting, which means adding flash units and slaves to trip the lights. With electronic flash, you cannot see the lighting effect until after the exposure, which complicates the placement of the lights. I would suggest starting with a continuous light source. If you are more advanced and have high-end electronic flash units with modeling lights, you should not experience the problems mentioned above.
Lighting 101
|
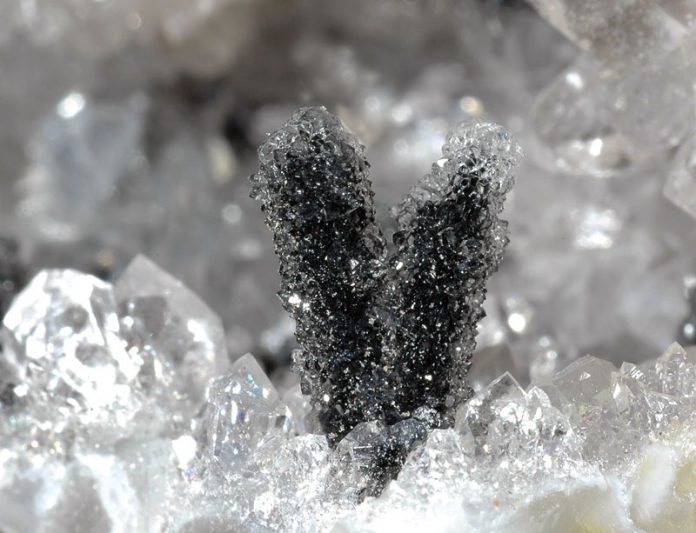
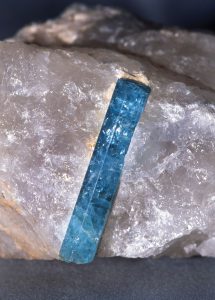
Lighting for Clear Crystals
When dealing with clear crystals, the following technique can produce dramatic results. Place a plate of clear glass on two supports that raise the glass at least six inches off a tabletop. Drape your black background cloth over an upright vertical support and down over the glass, so it just covers the glass. Find the approximate center of the part of the cloth that is covering the glass and cut a two-inch diameter circle out of the cloth.
Arrange the clear crystal specimen over the hole and gather the cloth around the base of the crystal so no gaps appear. Place your light under the glass and turn it on. Recheck your specimen for any gaps in the cloth which would now be obvious with the light shining through. The correct exposure should be determined by the camera but may involve some trial and error.
This story about how to photograph rocks previously appeared in Rock & Gem magazine. Click here to subscribe! Story and photos by Richard Gross.


