How to make a DIY lapidary workbench for small spaces is easier than you think. Many would-be lapidary artists lack the space to create a home workshop with lapidary tools like a rock saw, grinding/sanding units and more. They rely on facilities hosted by local gem societies. Unfortunately, not all societies enjoy such facilities and open time slots are at a premium in the societies that do.
Never fear! Even if you live in a tiny home, or apartment with minimal space, you can have a functional lapidary workshop at your disposal whenever you need it.
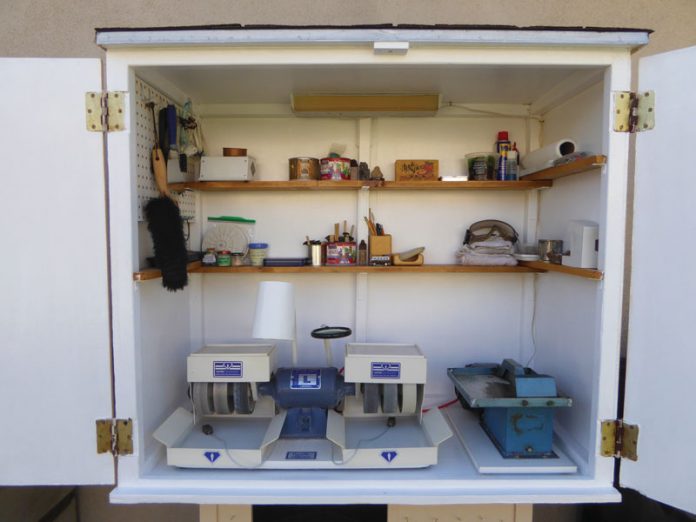
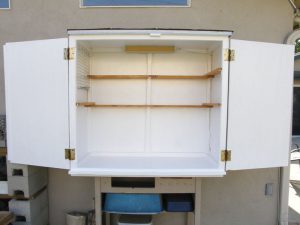
I’ve developed what I call a Workshop-in-a-Box (WIAB) that is just 4 feet wide by 3.5 feet high by 2 feet deep. It holds a Diamond Pacific Genie grinding/polishing unit and a 6-inch trim saw plus shelving and pegboard space for all the tools and supplies needed to craft basic lapidary projects like cabochons. My WIAB fits conveniently in a basement nook, garage, home corner, or, climate permitting, against an outside wall with access to an electrical outlet.
Getting Started
I built my WIAB using 95 percent recycled materials and only needed to purchase miscellaneous small hardware (nails, screws, corner braces), pegboard and paint.
As noted, my box dimensions provide space to hold a Genie and trim saw. Since I built my WIAB, Diamond Pacific has developed a new, wider Genie. So you may want to go 4.5 feet wide if using that new model.
Use all the measurements in these directions as approximations. Build your WIAB to match the space needed to house your machinery and the materials and lumber you have at hand. For instance, not all 2×2 lumber is exactly 2×2. Often the pieces are smaller. Once you’ve constructed the basic shell for your box from plywood sheets, adjust the other measurements accordingly.
Project Measurements
For my WIAB, I started by cutting five pieces of 0.5-inch plywood to craft a basic box. The sides measure 22 inches wide by 40.75 inches high. The back is 48 inches wide by 40.75 inches high. Finally, the top and bottom measure 48 by 24 inches. I deliberately made the top and bottom pieces wider than the sides to allow room for a rim in the front for doors.
With this basic box glued and nailed together, I installed 12 pieces of 2×2 lumber around all the inside edges and up the middle of the back to provide extra support for the box and support for shelving. Along the front bottom, I used a 43.5-inch-long strip of 0.75 x 0.75-inch wood rather than a 2×2 to allow a bit of extra hand space for working with cabs on my Genie.
For shelving, I attached six metal 4-inch corner braces to the back 2×2 lumber to support two 5-inch wide shelves along the back of the box. Each shelf measures 46.5 inches long. Halfway up the left-hand side, I installed one shelf that was 22 inches long and 2.75 inches wide. One corner of the shelf rests on the back shelf and the other corner is attached to a 2×2 with a 1-inch corner brace. On the right side, I installed two similar shelves, each with one corner resting on the back shelves and one corner attached to the front 2×2 with a 1-inch corner brace. I notched all the shelves so they would fit snuggly around the 2×2 interior framework.
Materials NeededImportant Note: Use dimensions provided here as approximations. Measure as you go with materials you have at hand and modify as necessary. TO CRAFT THE BASIC OUTLINE FOR A BOX: • 2 pieces of half-inch thick plywood 22 inches wide by 40.75 inches high for the sides • 1 piece of half-inch thick plywood 48 inches wide by 40.75 inches high for the back • 2 pieces of half-inch thick plywood 48×24 inches for the top and bottom IN THE BASIC SHELL: • 2×2 lumber in total length of approximately 34 feet cut into 12 pieces (five pieces 40.75 inches long; three 43.5 inches long; four 17.5 inches long) • Shelving with 0.75-inch thick wood slats with a width between 3 and 5 inches • Pegboard of 14×19.25 inches screwed to the left-hand side of the box via two 0.75×0.75-inch wood strips • 2 cabinet door handles • 4 hinges • L-shaped corner braces for shelving (six 4-inch braces; three 2-inch braces) • Nails and screws (approximately 3 to 4 dozen of each) • Woodworking glue • Rubber stopper (1.5-inch diameter) • Enamel paint (for interior) and flat paint (for exterior) • Optional overhead lamp |
Organization & Doors
On the left side of my WIAB, I installed a pegboard measuring 14×19.25 inches. I screwed it in place with two 14-inch strips of wood measuring 0.75×0.75 inches, attached to the left inside panel.
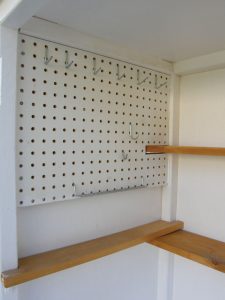
With a pegboard on one side and shelving on three sides, my Workshop-in-a-Box accommodates my basic lapidary tools and supplies: safety glasses, dop pot, dop wax, cans holding dop sticks, cab templates, cans for Sharpies and aluminum scribes to mark slabs via templates, cab rest, Water Aid wetting agent, jars of polishing compound, polishing disc and pads, small cans of motor oil and WD-40, paper towels and rags, and my ever-present Buddha sculptures to provide the calm patience needed while crafting a rock. There’s also room to hold small trays for rough pre-forms. The interior space is small, but it holds a lot.
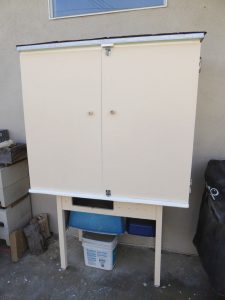
I constructed two doors of plywood sheets, measuring approximately 24×40 inches each, attached to the box with hinges. On the inside of the left-hand door, I installed a thin 1.25-inch wide strip to provide a seal to keep out critters. I also installed two barrel-sliding bolt latches to hold the doors shut, top and bottom. Other options could be magnetic cabinet latches or latches with locks. The door was finished off with two cabinet handles.
Tools NeededThe woodworking tools you need are basic and few. • Hand saw or (preferably) handheld circular saw • Drill with drill bits, including a 1.5-inch diameter hole-saw bit • Hammer • Screwdrivers • Paintbrushes |
Finishing Up
At the lower back corner of the right panel, I cut a 1.5-inch diameter hole for my Genie and trim saw electrical cords. The hole is sealed with a rubber stopper when cords are not in use and pulled inside.
Finally, I painted the interior of my WIAB with glossy enamel paint. This makes for easy clean-up from splashes off the Genie and the trim saw. I used flat paint for the exterior matched to the exterior of my home.
Given that my WIAB is outdoors, I added aluminum drip-edge flashing around the top edges along with shingles. I also took the added step of installing an overhead lamp, which I later found to be unnecessary given the lamp attached to my Genie unit provides plenty of light.
I mounted my WIAB on a wooden typing desk that I got at a garage sale. The desk is 31.5 inches tall and I’ve installed a shelf beneath it for extra storage space. The height is just right for my 24-inch tall stool. The height is also just right for standing at the slab saw.
With these basic instructions, you too can construct a Workshop-in-a- Box. Go for it and enjoy your home lapidary workshop space.
This story about how to make a lapidary workbench previously appeared in Rock & Gem magazine. Click here to subscribe. Story and photos by Jim Brace-Thompson.


