
By Jim Perkins
A round brilliant is often the first cut a new faceter learns. After that first cut, most become anxious to learn how to cut a “fancy shape.”
Fancy shapes are anything besides a round stone. I spent a lot of time developing computer-generated oval designs and other fancy shaped designs that are easy enough for beginners and also an enjoyable experience for advanced faceters. I avoid pre-Gem Cad designs, due to inaccuracies I’ve discovered. I would rather create my own designs using Gem Cad for Windows®.
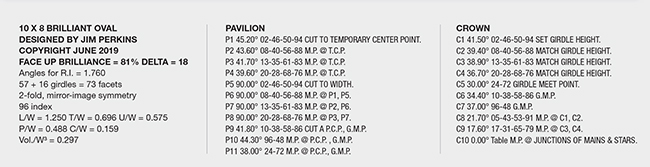
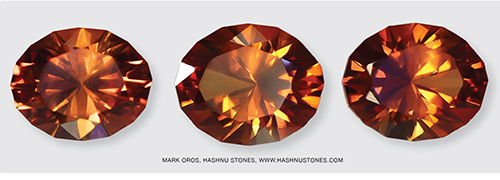
For this project, I have designed a 10 X 8 millimeter oval with a brilliant pavilion and brilliant-cut crown.
To test cut the design, I have chosen a Swiss lab-grown Padparasha Sapphire, as it is a beautiful color and inexpensive. The design will work in garnet, corundum, and zircon with no changes.
WHAT YOU NEED FOR THIS PROJECT
To cut my oval, I used a FACETRON faceting machine, a 260 diamond top plate for rough cutting, a 600 diamond top plate for fine grinding, and a 1200 diamond top plate for extra fine grinding. I used a BATT LAP with 3,000 diamond powder and candle oil for lubrication for pre-polishing, and a BATT LAP with 100,000 diamond powder and candle oil. All laps are supported on a MASTER LAP. I set the rough on a flat dop using Raytech Diamond Dop, which keeps it from heating up too much and coming off the dop. I also transfer the stone to a cone dop using 5-minute epoxy, and it cures overnight. After the transfer is complete, I put the cone dop in the dop chuck and align the girdle on the master lap. This ensures I will cut a straight crown girdle line.
GETTING STARTED
The first step is to study the faceting diagram and understand it thoroughly. Then cut the P1, P2, P3 & P4 facets to a temporary center point using the rough cutting lap. Then cut the P5 facets near to finished sized.
I cut mine so when I measure across the junction of the facets my digital caliper reads ~ 9 millimeters.
I proceed to cut the P6, P7, and P8 facets so they meet at the junction of their respective pavilion facets to make a straight pavilion girdle line. P6 will meet at the P2’s, while P7 will meet at the p3’s, and the P8’s will meet at the P3’s, as shown in the diagram.
Now go to the 600 lap and cut the size down by ~ .5 millimeters. Using the 1200 lap, cut it down to just a bit larger than 8 millimeters wide. Then proceed to the 3,000 BATT LAP and pre-polish at 89°. You only need to polish the portion of the girdle that will be kept. In my work, I don’t polish any further for the girdle.
Now return to the pavilion and cut using the 600 and 1200 laps. Then pre-polish using the 3,000 BATT LAP and the 100,000 BATT LAP. Be careful not to cross-contaminate the 100,000 lap. Lastly, you can use the 3,000 BATT LAP to cut the pavilion mains. Or if you’d prefer, go back to the 1200 lap to cut, and then polish using the BATT LAP and 100,000 diamond. When you are finished you can transfer your stone into a cone dop with 5-minute epoxy.

FACETING THE CROWN
Once I have the P5 girdle facets adjusted so they are parallel to my master lap, I cut and then inspect to make sure the crown girdle line is level and straight. If not, I make further adjustments to the alignment. If it is level, you are ready to proceed. It’s a good idea to wear an Opti-Visor so you can see the girdle line better. I start my crown with a 600 diamond lap followed by a 1200 diamond lap. Make sure to leave the girdle a bit thick as you continue working the stone, that way you will have enough thickness to work it down.
I cut the meet points precisely using my BATT LAP 3,000 diamond and oil. I recommend cutting slowly and taking breaks to rest your neck and back. Upon resuming, I use my 1200 diamond lap to cut the table, followed by using a plastic Dyna-Lap and 100,000 diamond on my master lap.
Once you complete the crown and table you can heat the cone dop and release the stone from the epoxy. Let it cool and then soak overnight in a sealed jar with Acetone.
SOME CUTTING TIPS
When you cut “fancy shapes” it can be difficult to achieve the exact nominal size. I believe if I cut my stone and the finished size is + .000, -.5 millimeters, that is good enough because settings with prongs have enough adjustment to compensate. In fact, if the stone is slightly undersized I find it easier to set than if it is oversized. I cut the table in to meet points after I have cut the crown breaks, mains, and stars. You’ll want to make sure the top points of all of the mains are touching the table. Sometimes you have to over cut some mains to touch others. If this happens, don’t worry about it.
After the table is polished, place the dop back into the dop chuck and polish the crown in the same order you cut. When you get to the stars that are on either side of an overcut main, cheat the angles of the stars upwards. To do this, lower the angle and raise the mast height. Depending on how much you need to cheat, you may have to lower the facet angle of inclination a few tenths of a degree to as much as one degree. Remember, you will use the same angle on the stars flanking the main. You may be lost doing this in the beginning, but after a while, you will become skillful.
With the FACETRON I rarely use the left and right cheater dial. However, vertical cheating is very common, especially on fancy cuts. When you feel the heat in your stone from friction during polishing, take a break and let the stone cool down. Otherwise, it may move on the dop or come off the dop completely. Another helpful reminder is to always use plenty of oil on your BATT LAP to keep the stone well lubricated and cool.
CONCLUSION
If you are thinking that this stone was a lot more work than a round brilliant. You’re right, it was. This is why fancy cut gems cost a lot more than round brilliants. They are labor-intensive.
In a future design, I will feature an oval design with a keel pavilion that will work for various materials, from quartz to higher refractive indices. It will take a while to cut, but it will make a spectacular gem. Remember that it is not important how fast you cut gems, but much more important to take your time, enjoy the experience and do the best job you can.


