
By Russ Kaniuth
Mexican Peanut obsidian was discovered in the 1960s near Alamos, Sonora, Mexico. In recent years it’s become exceedingly scarce as it has been a lapidary favorite for years. Many people are attracted to orbicular stones or something that resembles flowery patterns, and Peanut Obsidian has all that and more.
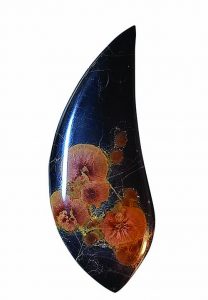
Though it’s not exactly obsidian, it is perlite with spherulites in it. The spherulites are radiating crystals of feldspar, tinted by hematite. They are quite chatoyant when cut and polished, which adds fascination to the already beautiful orbicular design in this material. The backing matrix is predominantly black but also comes in grey tones with some banding. The spherulites are generally reddish-orange and generally round; however, recently, I’ve seen batches where the orbs have split and grown in different directions or formed clumps of flowery clusters, which adds to the beauty of this stone.
Tips for Purchasing
 When purchasing Peanut obsidian, it comes in various sizes, anything from the size of a baseball to large 20-pound chunks. I have always noticed that the lighter the grey matrix, the softer and less stable the material will be. The best choice, in my opinion, is an all-black matrix, as it tends to be far more solid and stable to cut. No matter what, most of this material will have some fracturing to it, usually not a great deal, but there might be times that stabilizing is an optimal idea. The outer edges that have been exposed to the soil around it can soften the perlite and spherulites to a point where you can pop some out with your hands, but don’t worry; this is typical of this material and only on the outer areas.
Once you slab this material, the inner portions are generally very stable and have minimal fracturing. You may see small spiderweb fractures, but they are not usually very deep. However, you should do a bench test and either flex the slabs in your hand or lightly tap them on your workbench to see which parts fall off before beginning any work. Be cautious when doing these tests, as volcanic glass can easily cut, or worse, it can send small sharp shards in the air, which can cause severe eye injuries. Take extra precautions.
The fun begins after the slabs are cut as the orbs, or flowery clusters make for some great designs. If possible, consider adding a little extra black matrix in the back-ground utilizing negative space, it adds to the beauty of the stone, and accents the spherulite patterns. When cutting out your preforms, the thinner blades work much better on obsidians; they cut fast and clean without too much vibration that can cause additional fracturing.
Ready, Set, Cab!
Once you’re ready to cab, be sure to wear adequate eye protection, because as I mentioned earlier, this and any obsidian or glass can send small razor-sharp particles into the air when initially grinding out your shapes and domes. I start on the 80 grit steel diamond wheels and softly work out my shapes. Obsidian is relatively soft, so going slow with light pressure is usually best and avoids the additional chipping off the outer back edge.
At this point, I like to move directly to a soft resin wheel, either 140 or 220 grit and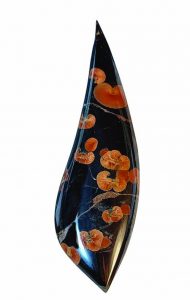 continue to smooth and dome the cab. From here, it’s fairly easy and routine; move onto your 280 grit wheel, and be sure to go no further until all the scratches are completely gone at this stage. Having canned air handy is quite helpful, as a quick blast of air will immediately show white scratches if they still exist.
Next, move onto the rest of your wheels until you have reached your 14k grit, at which point you should have a wonderfully polished cabochon that is ready to set in jewelry. But, if you want to go further and gain that added extra mirror polish, you can use cerium oxide on a leather buffing wheel. Just be aware of any open areas, whether it’s a hairline fracture or a small hairline gap on the edge of the spherulite and matrix, as these spaces will fill with compound and be difficult to clean after.
You should be able to find this material at the Tucson shows this spring, and you can always obtain the material from Tanner Singleton on Facebook, via the Slab Depot Group.


