
Story and Photos by G.E. Sommerfeld
I remember the first time I viewed a statue from the Easter Islands. It was way back in the early ’60s on black-and-white TV. I was captivated and totally intrigued. Olmec, Aztec, Mayan and Hawaiian statues were equally fascinating. That bond to the ancient civilizations and the stone cutter is still with me today. I see those ancient statues and imagine the guy with the stone hammer and chisel chipping away at that chunk of rock, seeing an image in the solid stone.
What did he think of the enormous task ahead of him? What did his tribe think? Did he know it would still be here for us to see today, so many years later?
With the use of electric motors and diamond-coated shaping bits, the job of sculpting stone has been made much quicker and easier. A tabletop-size (about 12 inches long) slab of quartz (Mohs 8) can be roughed out in hours instead of days or weeks. Control of the exact amount of stone removed has greatly improved, as well. This quick change from rough stone to rough sculpture is invigorating, both to the piece of stone and the sculptor.
Carving Opens the Door
Inspiration can strike, plans can change, and results can exceed the original expectation. This is the magic I wish for with each new piece I attempt.
There are a limited number of ways to shape a stone. Mother Nature shaped it first as a liquid mass deep below the surface. She went at it a second time with wind, rain, snow, ice and the relentless heat of the sun. Over the course of a million years or so, the Sawtooth Range in Montana, the Rocky Mountains, and the high plateaus and strange rock shapes in Utah and Arizona, among others, formed.
Man began to shape the stone during mining operations. The last force to act on it is the sculptor. In the days before electric motors, chipping with a variety of hammers and chisels was the only way to work the stone. I’ve tried that, but found that the method is too slow and tedious, and doesn’t give me the control I need. Modern grinding equipment speeds up the process tremendously. Since grinding makes lots of dust, I do all my grinding outdoors. Even using an exhaust vent run by a fan will not take all the dust that is generated with the diamond grinding bits out of the air.
My sculpture methodology is fairly simple. I try to find some suggestion of an image hidden in the concave and convex surfaces, grains and patterns of the rock. Then I ask myself, “Do you really want to do this?” The act of sculpting stone is not easy. Grinding away a fraction of an inch of stone with each pass of the grinding bit takes a commitment of time and energy. The time it takes to shape gives the sculptor ample opportunity to “redesign”, if need be, to stand back, look, and really see whether you are happy with the direction the carving is taking. If you’re not, how will you change it? After the modification in design, what will you discover in the stone? Is the change worth it? Does it make it better?
Approaching Individual Stones the Same
My creative process has been the same for over 20 years. The rock is invited into my home. After it is made comfortable in the living room, in a place I can easily view it, the real work begins. I glance at the piece, stare at it, turn it over, and look at it from every angle. I prop it up with a book, lean it against a table leg, or just lay it on the floor, view it from high on a shelf, on the mantle, or on a tabletop. What looks good, what looks bad? The quest is to find something in the current features of the rock that hints at the finished sculpture. The length of this process varies with each new piece.
Once the idea has formed, I place some lines on the rock so I don’t forget what inspired the commitment to grind this particular rock. I place as few lines as possible, since I don’t want to be confined by my first impression, and my sculptures evolve from that point.
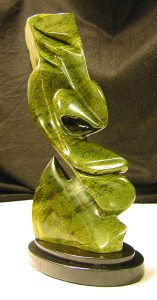
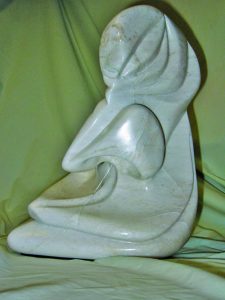
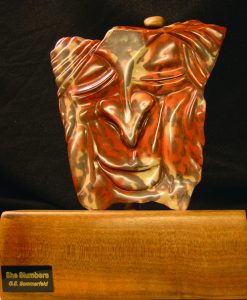
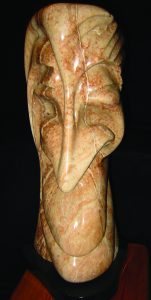
I’ve been in a “face study” for many years. Consider all the angles involved in the human face. These have the potential to expose many different views of the stone. My sculptures have a certain style in merging these features. The rock can actually help with this, depending on the colors and textures found in the rough. The suggestion of an eye, cheekbone, or upper lip has fueled me more than once.
I include some sort of distortion in every piece as a social statement. It seems everyone has a feature they don’t like, such as a big nose, full or thin lips, or a small chin. I poke fun at that with exaggeration, but the beauty of the stone counteracts my hint at humor. I try to expose as much of the stone as possible and still stay true to the original concept.
Finding Peace in the Process
Grinding is a very Zen experience. By this time, I feel at one with the rock. I have lived with it and it had spoken to me. I’ve made a commitment to let the rock evolve into whatever is really there. To respect what we do together, I will refer to the rock as a stone as soon as the grinding begins. You see, in my mind at least, a stone is much more than a rock.
The first cut is important, as it sets the mood for the relationship. Remember to stay
away from details at this stage. Trying to bring out details during the rough cut bogs you down, and the details could disappear as the carving evolves. Focus on the form in both close-up and long-range views. Is the shape pleasant to the eye and the mind? Step back and check it out. How would a change affect the design? Figure it out, grind, and review again.
Rough cutting can be a quick or slow process. There are many variables involved and decisions to make. If there is an issue that you need time to resolve, put the piece aside. Something will eventually click, and you can resume grinding. Never try to force the flow; creative juices seldom can be turned on and off at will. Some ideas need time to mature. Remember, you can’t rush the rock. The rock is the one constant in the equation. The other factors are the desire to expose what is hidden and maybe make a personal artistic statement. These factors can change depending on personal experiences.
I use a 4½-inch angle grinder to rough out the shape. I have small hands, and this unit fits securely in my gloved hand while sculpting. This is the most dangerous tool I use, so safety is always foremost in my mind.
I use a 4½-inch diamond turbo cup wheel with the 4½-inch grinder in the roughing-out process. This is a consumable item, as it will wear down. How often it will need to be replaced will depend upon the hardness of the stone you are carving. I do not use this tool for any kind of detail grinding, but to cut the stone within ¼ to 1?16 inch of the finished size and shape.
Working in Union With Tools
A rotary tool is my favorite for doing the mid- to final-stage grinding. The models that offer more than one speed seem to be the most useful.
Sometimes, a slower speed is needed for making very delicate cuts. This tool transforms the shape of the stone from an idea into an actual example of the image you envisioned.
I use a flexible shaft grinder and carver for the finish grind. The flexible part of this device allows you to make cuts in places the rotary tool cannot access, and it makes complex concave grinds and cuts possible. The flexible shaft gets hot, so remember to take breaks when using it.
Diamond rotary point sets are good for mid- to final-stage grinds. These bits come in a variety of shapes to suit your grinding needs. These are also considered consumable; they get hot with use and will lose their cutting properties.
I use diamond-coated rotary cutting disks for finish grinds like accentuating a line that needs to be seen from a distance. The impact of a feature can be enhanced by placing it correctly on the stone. These types of cuts almost always require you to feather or smooth the edge that is created by the cut.
Bring Out The Magic
I use diamond-coated files to help remove excess material from hard-to-reach places in the finishing stage and create flat surfaces that will expose the beauty of the stone. The stone’s surface has to be totally smooth before its colors will become vivid and alive.
Sanding brings out the magic in the stone. I use sandpaper 60 grit to 1500 grit and higher. The goal is to create the flattest and smoothest surface possible to bring out the “life” of the stone.
I get my grinding bits at Harbor Freight, but there are Internet sources, as well. I look at diamond bits as consumables and often use them up when sculpting. The bits get so hot that the adhesive holding the diamond dust to the bit melts, and the diamond dust is lost. When this happens, the bit is no longer useful in cutting the stone and must be replaced. This happens especially when the sculptor is too heavy-handed with the tool. Try to go slower and do not grind beyond the capacity of the bit. It doesn’t matter how expensive the bit is; if too much force is used, the bit will be ruined.
The size and shape of the grinding bit required is dictated by the job that needs to be done. How to grind, how to hold the tool, and where to start are things only experience can teach you, as we are all different. Don’t take on too much at once–start small and use softer stone to gain that experience.
Generally, in order to make the shape you want, a channel must be ground out and then expanded. The “removal method” of sculpting, however, only gives you one chance to be successful. An error usually means you have to redesign the piece or toss it out. Grinding the general shape into the stone is a competition. The fight is among grain, color, texture and hardness, which often overshadow the grinding details. Details take time to produce and can be lost when you sand the stone. I tend to concentrate more on impressions and let the viewer’s imagination fill in the details. I let the stone be the center of attraction.
Sanding is my least favorite activity, but it brings the greatest rewards. Hand sanding stone with a Mohs hardness of 6 or above is especially tedious. Start out by dry sanding with a grit of 80 or 100. When the surface is uniform in texture, switch to a finer grit. As you sand the stone, its hidden beauty will start to emerge. This beauty inspires me to continue with the process of sanding.
Character of Cuts
Concave cuts are the most difficult to smooth. Remember that all surfaces of the piece must have the same texture before you change to the next sandpaper grit. If you get in a hurry and change too soon, you will be wasting both time and sandpaper. As with all the processes completed so far, there is no quick way, only the right way.
At about the 220 grit sandpaper stage, it is time to “go wet”. Make sure the sandpaper is intended to be used with water. There is good sandpaper and not-so-good sandpaper. My experience has shown that the cheaper the sandpaper, the shorter its lifespan.
Do not try to make too much of a jump in grit size, such as from 200 grit to 400 grit, or you will have to work awfully hard to get the stone to that 400 grit finish. It is best to resign yourself to the fact that sanding will be a slow process toward the finished product. To really show off what Mother Nature has created, the stone must be sanded to the 1500 grit surface texture. It will seem to take forever. I tend to take breaks in the sanding process so I don’t get discouraged too quickly. Once you are satisfied with your work, let the stone sit for a while. You need to remove yourself from the sanding mode and get into into judging mode, then examine the surface for missed spots. I am sure you will find a few places that need more work. I develop a love-hate relationship with every piece during the sanding process.
Safety
I would be remiss if I didn’t address the safety concerns in using a grinder with
diamond bits. If it can cut rock, just imagine what it would do to your body. I use a tightly woven German World War II overcoat as my apron. This coat has deflected a grinding bit when I’ve gotten reckless. I also wear a neckkerchief over my mouth and nose for an air filter. Safety glasses are necessary every time the grinder is turned on. I’ve noticed that the debris can go almost anywhere, whether the diamond bit is turning at a fast or slow rate.
Gloves are needed to grip the grinder. The stone must be fastened securely so that it does not move when you put pressure on the grind. And the speed at which you pull or push each grinding path must always be slow, both for safety and to control the removal of material.
The next step is to wax the stone. Through all these steps, wetting the stone can give you a glimpse of its hidden beauty, but wax is the permanent finish that preserves the beauty. I use a very good grade of floor wax (Trewax®), which will not give the stone a yellowish cast. Look for a wax that has the clearest finish possible. Use only enough wax to do the job; more is not better. Once the piece is waxed, it must be examined in detail. If you are like me, you will find way too many places that need additional sanding, but it is well worth the extra work. A “jewel” finish is not an easy goal, but when attained, it is wonderful in exposing the beauty of the stone. Dust the sculpture when you clean house and plan on re-waxing it about once a year.
I’ve sculpted in wood, clay, wax and stone, and have found that stone is the most satisfying for me. If you are a novice, I suggest alabaster, calcite or soapstone to start with. These stones have a low Mohs hardness, are forgiving, and can easily be given a good finish. They are ideal for experimenting with carving techniques before moving on to harder materials like agate, quartz or jasper.
With all there is to remember when you sculpt stone, how can this be any fun? Once the sculpture begins to take shape, the excitement of creating something from virtually nothing makes this process lots of fun and very fulfilling to an artist.


