
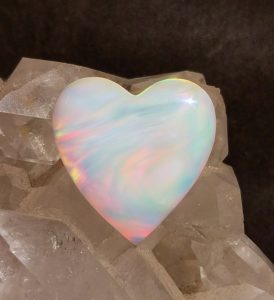
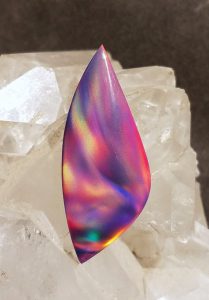
Aurora Opal is a homogeneously crystalized, synthetic, impregnated opal. Roy Goldberg, at Aurora Opals, describes this material as irregular and fine crystalline, with nondirectional, multicolor swirls, with green, orange, blue and red being the dominant colors in the spectrum.
I see lots of new materials being introduced into the lapidary world. There have always been a large number of “purists” who do not like to work with anything that is not a natural stone, but many like myself feel that trying something new can be fun, adventurous and challenging.
Intrigued by Synthetic Opal
After reading through Roy’s website and admiring all the various pictures, I was definitely intrigued enough to try this material.
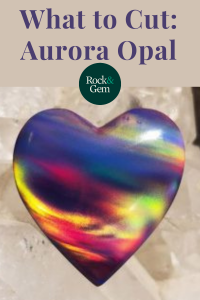
I purchased the red and white variations to try first and was just amazed when the material arrived. Whether outdoors in natural sunlight or indoors, the play of color in this material was just outstanding!
To begin with, I cut the blocks I received from top to bottom into slabs about 6 mm thick. Usually, when cutting smaller items, I use a 10-inch trim saw, running just with water. Since Aurora Opal is a resin-based material, I don’t see any issues cutting it with either water or oil in the saw.
When you have cut your slabs and preform shapes and are ready to start the cabbing process, remember that this material is only four on the Mohs Scale of Hardness, so you definitely want to start on a less coarse-grit wheel; I suggest the 220 grit wheel.
Committed to the Drying Process
 With all resin-based materials, it’s important to dry off the cab at every interval of the process to check for any deep scratches from the prior stage. Micro swirl marks are quite common with synthetic materials but don’t be too alarmed in the earlier stages, as they will work themselves out as you go.
I made several cabs from this material, experimenting with different dome heights to see if there was any difference in color play, and in my opinion, higher domes catch the light from all angles, making the cab more eye-catching when set into a finished jewelry piece.
You can also experiment with the color swirl angles. They seem to run more horizontally in the tray, so when you get your blocks cut down, try orientating some horizontally and some vertically for variety.
Cabbing Aurora Opal
 The cabbing process is quite simple, starting with 220 grit and ending with 14000 grit. Higher-grit wheels will definitely give you a glossier shine, but they are not a necessity. Once I finished on the 50000 grit wheel, the cabs were perfectly ready to be set into jewelry.
I don’t think any further polishing compounds are necessary, but if I were to attempt to go a step farther, I would use white rouge lightly to finish the polishing. Be extremely careful not to heat the stone up while attempting to polish though—this is a resin, and will melt if heated up too much. Then it’s back to the drawing board!
This What to Cut column about aurora opal previously appeared in Rock & Gem magazine. Click here to subscribe! Story and photos by Russ Kaniuth.


