
By Bob Rush
Since my wife and I moved into our retirement house in California’s Gold Country a number of years ago, I haven’t spent much time working on jewelry projects. For no particular reason, I have been focusing on making large cabs, especially ones that have inside curves or some element of carving incorporated into the piece.
Satisfying a Jewelry-Making Urge
Lately, I have gotten the urge to get back into making small cabs that are more suitable for jewelry, especially cabs designed with unique, curved patterns in the rough material. Finding these pieces with that unique pattern in a small enough size to be suitable for jewelry projects takes a lot of searching through my abundant drawers and piles of rough. It seems like the ideal piece always turns up with a poor pattern or color or the ever-present fracture right through the best area.
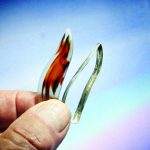
I have always liked Montana agate for the durability, patterns and colors that it has to offer, so that led me to focus on some smaller slabs that I have in my Montana slab drawer. I found a lot of likely pieces, but rejected most of them due to their pattern, color or size.
Finally, I settled on this piece and sketched a pattern on it that would work for the pendant project that I had in mind. It had a pattern that would let me incorporate the inside curves that I like to make. It allowed me to avoid the typical subsurface fractures that are found in Montana agate, and the size that I had in mind fit the piece perfectly. Cutting, shaping and polishing it posed no particular problems.
Working With the Shape of the Cabochon
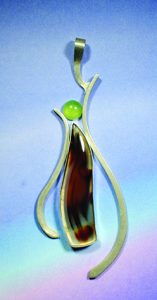
Because the cab has a sharp point, I realized that it would take an extra effort to properly make the silver bezel that I needed for the pendant. I always prefer to make the girdle of the cab straight-sided, tapered inward about 15°, and make the top edge of the girdle slightly lower than the standard 18-inch height of the bezel strip. This allows the stone to be set with standard bezel-setting techniques and results in minimal coverage of the stone by the bezel strip.
Also, the height of the tip of the cab must be maintained so as to minimize the work needed to push the bezel strip against this part of the stone. The cab ended up being almost 2 inches tall, which fits well within the overall size of the pendant.
Because I like to let as much light through as possible to emphasize the stone’s color, I set it with an open back. This keeps any silver backing from influencing the natural colors of the stone. This also means that the back of the stone needs to be finished to the same quality as the front, which I always do as a part of my standard cutting procedure.
How I made the small green cab will be explained in next month’s article.
Author: Bob Rush
 A professional within the lapidary industry since 1958 and metal work and jewelry since 1972.
He teaches at clubs and Modesto Junior College.


