
By Russ Kaniuth
The Ochoco National Forest in central Oregon is home to so many well-known agates, from Maury Moss agate, and Ochoco tube agate, to various thundereggs. One, in particular, is quite beautiful, even without a great variety of color.
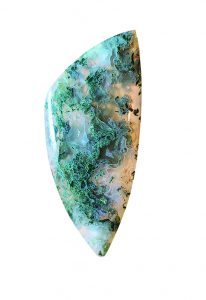
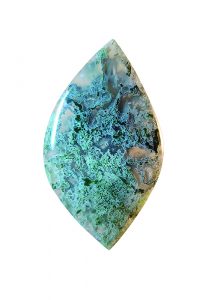
Ochoco Moss agate is a clear to milky agate with beautiful waves of various green and white moss streamers running throughout. This particular material can also contain waterline agate sections and soft white ghosting fortifications. When it comes to cabbing this material, you just never know what you will get. Though most of this material is considered a rare find in new deposits, it can still be found at shows and online. Much of what you’ll see when looking for it on eBay or in the Facebook groups is old stock dug in the late 70’s and ‘80s.
When purchasing Ochoco Moss agate, sometimes buying slabs is best. I say this because you’ll see what you’re getting. However, choose to buy your material in the rough. The mossy patterns will often run continuously through the stone, while other times, it is concentrated around the edges of the stone, and the center portions will include only agate.
 When I begin cutting rough, I generally like to start by cutting it in half. This way, it allows me to see all the patterns and the various directions. If it happens to be a stone where the moss patterns are generally just around the edges, then hand cut each slab by cutting the sides off and rotating as you go, much like cutting the rind off an orange. This approach will yield some beautiful areas to work from, but note, you will have to grind from the outer edges to smooth over the top dome of your cabs, which might take just a little extra work, but is worth the effort.
Once the slabs are cut, you can look for any hidden fractures, or sometimes you may find heavy concentrations of moss that will split in half because there wasn’t enough agate holding it together. Most of the time, all that is needed is to flex the slabs in your hands or lightly tap them on the workbench to see if you hear a fracture, or it breaks off. If there is “good” time for anything to break, this point in the process is better than when you’ve trimmed out your preforms and started grinding your shape.
When cutting the cabochons, just know that many Moss agates such as this one will tend to undercut ever so slightly in the moss areas due to the moss and the agate’s uneven hardnesses. If the moss is fine strands and not concentrated in one spot, it shouldn’t be an issue; however, if the moss strands are thick, you may notice an uneven surface where you will see the moss areas undercut. There’s no real solution to fix this. It’s just part of the stone’s nature and will hardly be noticeable in the end.
The cabbing process with this agate is relatively routine. I start on the 80 grit to shape the preform and form the dome. Once it’s smoothed out on the 220 grit stage and I move onto the 280 grit soft resin wheel, this is the point any undercutting is noticeable. It’s always important to stop occasionally and dry off your cabochon and at this point, check for any scratches. You don’t want to move forward until all the scratches have been removed. From here, the final steps are super easy, and you should notice a beautiful shine even after the 600 grit wheel, but by the time you reach your 14k grit, it will show you a gorgeous mirror polish showing off all its natural beauty, and depths within.
This particular moss agate is also a wonderful material to back and make cab doublets with, where you will see some extreme depth within your cab.


