
By Bob Rush
Recently while I was discussing various carving techniques with Jack Hoque, the glyptic artist featured in the December 2018 issue of Rock & Gem, the subject of carving very small hemispheres came up.
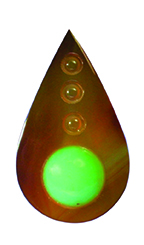
We both agreed that there doesn’t seem to be very small diamond cup burs suitable for what we wanted to do. As a decorative element, I wanted to be able to carve a small hemisphere into the surface of a cabochon.
Experiment and Improvise with Tools
I decided to experiment with available tools and to improvise with some handmade tools. Among my selection of diamond bits and drills, I found a 5.2 mm core drill. It had some small holes drilled in the sides, which I presume were to circulate more water around the drill for cooling during the drilling process. The holes were a great tool for me to determine the depth of the drilled hole.
 After achieving the desired depth, the remaining center core had a cylindrical shape that needed to be shaped into a dome. For this, I made a tool to complete the grinding. I cut a 1-inch long segment of a common nail that was 4.2 mm in diameter. Then, I used a 3 mm ball bur to carve out the center of the nail. Next, I mounted it into a flex shaft chuck, and dipped it into a small plastic condiment cup of a mixture of water and 220 grit tumbling media. At this point, I proceeded to grind the cylinder into a dome. This process went rather quickly.
After washing out the bit and hole I followed this with 400 grit and 600 grit steps to fully shape the dome. The next step required making another tool to polish the dome. For this step in the process, I cut a 1-inch long piece of 4 mm wood dowel and used the 3 mm ball bur to shape the cup, which I had done on the nail piece. I added a little water mixed with some Rapid Polish in another condiment cup and proceeded to polish the dome in the same manner as grinding.
Fabricating to Get Desired Appearance
After accomplishing the above, I inspected the stone rather closely and found the outer rim
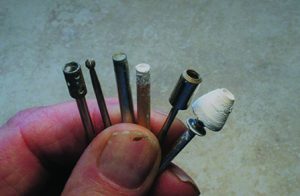
edge of the hole chipped from the action of the core drill. This required fabricating another tool to grind the edge smooth. Utilizing a ¼-inch straight wire end brush, I removed the wire bristles and shaped the outer edge with a file until I had a bevel. This tool fit perfectly so I could grind a bevel on the edge of the hole. Again, I dipped this tool into various grits and ground the edge down below the chips in the edge.
The final step involved fabricating a polishing wheel. I installed a ½-inch long piece of a ½-inch wood dowel on a screw end mandrel and shaped it to a cone with a coarse file. I dipped this into the cup containing the wet polish and polished the edge.
The resolution of all of these activities resulted in the effect that I wanted on the cab.
Author: Bob Rush
 A professional within the lapidary industry since 1958 and metal work and jewelry since 1972.
He teaches at clubs and Modesto Junior College.


