
By Russ Kaniuth
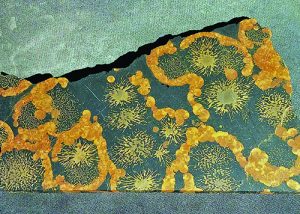
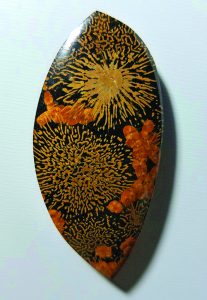
Starburst obsidian is one of those surprise stones of a few years ago—it become one of the biggest fan favorites overnight. By looking at the stone itself, it’s almost hard to believe it’s a natural stone and not altered or man-made. The obsidian has anorthite inclusions, which look very much like strings of the reddish, radiating spheres that characterize Mexican Peanut obsidian, and starburst patterns that simply look like fireworks filling the dark skies of a 4th of July evening.
Starburst In the Sauceda Range
This material is found only in the Sauceda Mountain range, which is located within the Barry M. Goldwater Air Force Range in Arizona. This means there are some extreme obstacles to collecting this material. For the most part, Starburst obsidian is acquired through private collections and estate sales, and it is certainly highly desirable right now.
 When purchasing this material, look for the most stable pieces; most of what’s out there is pretty badly fractured, which could mean there are lots of unusable portions or that stabilization is needed.
This is also something to be considered when you’re choosing the cutting direction in preparation for slabbing this material. The patterns should be very much the same in any direction you cut, sot it’s best to assess which way you can cut it and get the best solid portions out of it.
Most lapidary artists slab their material and then test it for fractures, or work around the fractures so they aren’t in the middle of their cab. This is definitely something to consider when working with Starburst obsidian.
Watch For Fractures
From what I’ve experienced when working with this material, the fractures within the black obsidian areas are what you should be most concerned about. This tends to be where the slab or preform could break apart. There also tend to be small fractures within the light-brown areas that look like fireworks. Those are usually superficial, though, and don’t affect the stability of the stone at all. These areas certainly can be filled in or just left natural as the stone’s natural character.
 When starting your cabbing process, I advise not using coarser grit wheels on this material, as with any obsidian; it could fracture the stone or chip large areas off the edges. I suggest starting with 180 or 220 grit hard diamond wheels, using a light touch. Obsidian isn’t very hard and is easily shaped.
From this point, allow your 280 soft wheel to do the work for you. It will smooth out any flat spots and scratches rather easily. This is also a good place to stop, dry off your cab, and see if any open fractures show up. Determine whether you want to fill in these areas or proceed, allowing the stone’s natural characteristics to influence the look and feel of your finished work.
The rest of the cabbing process is rather easy and is no different than with any other cab, but since it is obsidian, be sure to dry off the cab in between each stage and look for scratches. Don’t proceed without getting those out.
The polishing stage can be done in a couple different ways. I generally use cerium oxide on a leather wheel, but I always keep a tub of water and a toothbrush handy so that I can clean out any small fractured areas in which the polishing compound may stick. Aluminum oxide on leather or 50k diamond paste on felt wheel will also work well. Any of these finishing methods will give your Starburst obsidian cab a beautiful polish.


