
Setting opals without prongs is one of the best ways to preserve both the beauty and value of these delicate gemstones. Over the years, I’ve always told my students, “If an opal is going to break, nine times out of ten, it’s going to be during or because of setting.” For decades, opal experts have warned against using prongs—but convenience often wins out over setting opals without prongs. Unfortunately, setting opals in prongs is a gamble, and all too often, the stone loses. It’s time we stopped the heartbreak and learn the right way to set these precious gems. So, I cry out into the darkness, “Stop the needless waste of precious opal! It’s time to… just say no to prongs!”

Why Setting Opals Without Prongs Matters
Prong settings are pretty. They are classic. They are elegant. But they don’t play well with opals and the main fault is in our hands.
The first problem with prong setting opal comes from applying uneven pressure. Remember, opal has a conchoidal fracture; it behaves like glass to heat and pressure. Opal is soft with a Mohs hardness of 5.5 to 6.75, and metal prongs are usually harder than the stone. Either during setting or wearing the finished jewelry, prongs can create uneven pressure around the stone, while leaving the rest of the stone unprotected. The better option is a bezel setting, providing a strong and even foundation.
Another reason to avoid prongs on opals has to do with color play. In theory, light should enter the stone, go through the color bar, hit something opaque and bounce back. Depending on the type of opal, its color and level of translucency, color play can wash out when backlit. Using a bezel setting with a solid back plate can help to maximize the natural color play in an opal.
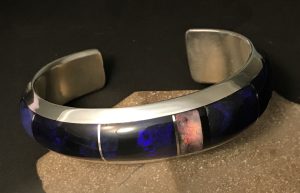
Traditional bezel settings provide a wall of metal that surrounds a cabochon stone and a base plate where the stone sits. It provides better support than prongs and more evenly distributes the pressure. Let’s start with a few principles and techniques for setting opals without prongs in bezel settings.
How Prongs Put Opals at Risk
Most cabochon cutters learn early on how to use a template to establish the general size and shape of a cabochon. Before creating the dome of the stone, cutters use a tool called a cab rest to establish a girdle at about 65° or less. When cutting opal, we find that angle is too sharp and leads to stones that are more likely to crack or chip. We prefer the girdle to be about 90° (perpendicular to the base) and at least 2mm high before starting the dome. While a relatively high dome is preferable in opal, lower (flatter) domes are often necessary to expose a thin color bar layer. So, the 2mm girdle guideline helps give the stone the depth it needs to be set.
Typically, the base (bottom) of a cabochon is flat. The junction between the base and the girdle creates an edge. It’s a good practice to round off that sharp edge, making it less likely to chip. It also adds a little extra space for that surplus solder at the base of your bezel.
The simplest bezel setting for a metalsmith to fabricate is a round or oval stone. It is also one of the easiest for the lapidary to cut. The goal of cutting opal is to maximize the quality and quantity of color play to increase the value of the stone. But color play rarely forms in ovals. With other less-expensive stones, it’s okay to trim off a little stone to make an oval. But opal can potentially be several thousand dollars a carat, so we take a different approach. We start with finding the color play in whatever shape it comes and do our best not to cut it away. Enter the freeform girdle. We often end up with irregular shapes and some with corners or points. Corners can be a challenge to set, so we need to round any pointed corners on the girdle of our opal before making the setting. The more we round the stone, the easier it will be to achieve a smooth bezel finish. It becomes a balance of risk/frustration, carat weight and aesthetics.
Best Girdle Shape and Dome for Opal Settings
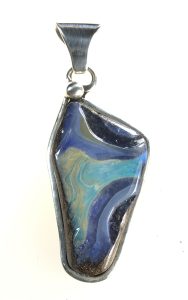
Not all beautiful opal is solid opal material. Sometimes the precious opal forms in a layer on top of another stone. Typically, this material is bezel set. The bottom of the stone isn’t very pretty, but it does provide a stronger foundation than precious opal alone. This material is typically opaque so you don’t need a solid backing on your setting to retain the best color play.
Pressure, Tools, and Mistakes to Avoid
The biggest mistake in bezel-setting opal is that we push too hard to get that final snug fit. The tool skids across the surface and scratches or chips/cracks the stone. Try these suggestions.
- Consider a softer bezel pusher. Brass is good, but wood might be better.
- Hold the tool like you are peeling an apple rather than pushing a lawn mower.
- Don’t press hard. If the bezel is thick, try thinning it a bit before adding the stone.
- Use a softer metal for the bezel itself (fine silver or 18k gold) but not for the rest of the setting.
Should You Use Glue When Setting Opals Without Prongs?
As a purest, you wouldn’t want to glue a stone in place, especially a precious opal set in gold. But for the hobbyist, you can add a small drop of crystal clear, very thin jeweler’s glue, such as Hot Stuff from Satellite City, after you finish pushing the bezel in place. This provides a bit of cushion and added security to hold the stone in, especially with a short bezel. Be sure to wipe off any excess immediately. Disclose this as you would any treatment.
Finishing and Polishing Your Bezel-Set Opal
After you finish setting your opal, you might need a final polish. I have a buff with Zam dedicated to finishing settings. It helps smooth the edge of the bezel without scratching the stone. As a last touch, I like to use Super Polish (a water-soluble wax paste) from MtMist.com with a felt buff on my micromotor/Flexshaft. It’s a little pricey, but a little goes a long way! 14k or 50k has a better finish than other polishes I’ve tried. I use it on my competition-grade carvings too.
Creative Alternatives to Traditional Bezel Settings
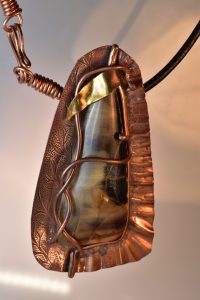
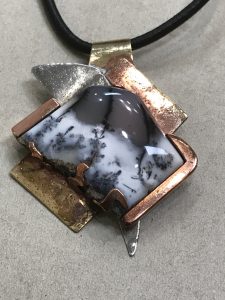
Sure, you can churn out traditional white multicolor opals in plain settings, but the market is already saturated with these. Setting opals without prongs in bezel settings doesn’t have to be traditional or boring. Get creative. Find interesting stones. Seek ways to complement the nature of the stone rather than compete with it. And save your gold for your brightest color play.
How to Safely Use Prongs When You Have No Choice
Here are some tips if there is no other choice but to use prongs.
- Before you set your stone, make sure it is free of cracks and crazing and has a girdle of at least 2mm. If 2mm isn’t possible, put those stones aside to bezel set or inlay.
- Decrease your pressure.
- Bend each prong a little at a time, using the alternating principle, North, South, East and West, repeating slowly and gently.
- Consider annealing the setting and thinning the prongs to make it easier to bend.
- Provide a foundation for the stone to sit only using prongs for additional support.
- Use a setting with more prongs to distribute pressure more evenly.
Final Thoughts on Setting Opals Without Prongs
Different types of opal vary in softness, brittleness, and inclusions, and each reacts differently to light, pressure, and heat—so there are no hard and fast rules. If you’ve never had trouble setting opals, you’ve either been extremely careful or incredibly lucky. But for the rest of us who’ve experienced that heartbreak—or avoided working with opal altogether out of fear of ruining a valuable stone—I encourage you to try. Don’t begin with your most expensive rough. Practice setting opals without prongs using common opal or even glass. Be creative, experiment with secure bezel designs, and most of all, be patient—with the opal and with yourself.
This story about setting opals without prongs previously appeared in Rock & Gem magazine. Click here to subscribe. Story by Cheryl Kasper.


