
Faceting rutilated quartz can produce amazing gemstones for jewelry, pendulums and collector gemstones. To obtain beautiful results, the lapidary faceting the rutilated quartz has to consider many things during the design including the preforming, faceting and setting process. Using the following instructions, you will learn how to create a faceted rutilated quartz masterpiece.
Why Rutilated Quartz Stands Out
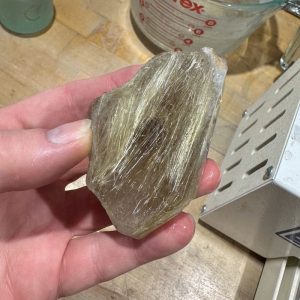
Rutilated quartz is a fascinating lapidary material. You have both the beauty of quartz and the rutile inclusions that give you a separate crystal formation within the quartz crystal. This happens when both quartz and rutile minerals grow together during the crystal’s creation. Rutile can be found in clear, smokey and citrine quartz, and the colors of the rutile within the quartz can vary from gold, copper, silver, red and black, to everything in between. This gives the lapidary a broad pallet of colors. Not only does the rutile come in different colors, but the rutile crystal needle formations originate in different widths, lengths and patterns. The variety in rutilated quartz opens many possibilities to the design, both internal and external, for your faceted gemstone.
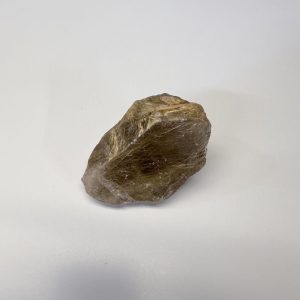
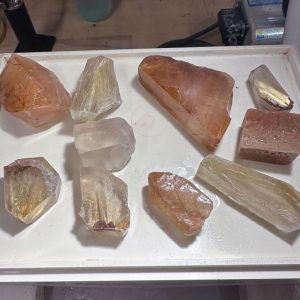
The clarity of the quartz and the color and internal design of the rutilated quartz are the defining attributes to consider when purchasing rutilated quartz to facet. The majority of the rutilated quartz that I purchase is from Brazil. The rough crystals come in all sizes, from just a couple of carats to a kilo (5,000 carats). It is not unusual for large, rough crystals to have suitable and non-suitable portions of the crystal to facet. Rutile quartz is inexpensive enough to buy a piece of rough and cut away the non-facetable portion. I recommend both Storied Gemstones and Pretty Rock for purchasing rough crystals. I also picked up some nice old stock rough from TMS Gems at Tucson last year.
Designing with Rutile in Mind
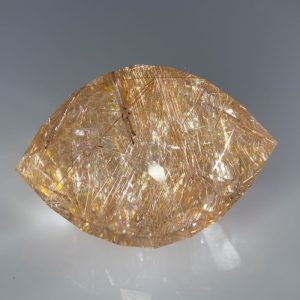
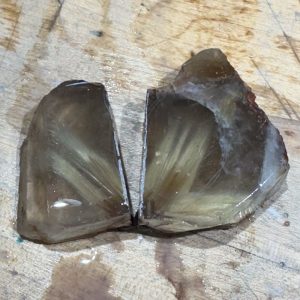
There are two different designs to consider when faceting rutilated quartz. The first and most important is the design of the rutile crystals within the quartz. This is to be the main focal point of your faceted gemstone. Think of it as if you are framing the rutile formation within the outline of the gemstone design. I like to think of the quartz portion as the canvas of the creation and the rutile as the painting done by nature. The gemstone design and shape are the frames that I have chosen for this piece of art. Rutile has many crystal structures, from spray, single strand, fully included, a mix of colors and more. The most important part of the process is to choose the rutilated pattern that you wish to feature in your gemstone at the beginning of your faceting journey.
Once you have decided on the part of the rutilated quartz crystal that you want to feature in your gemstone, the second step is to decide on the gemstone’s actual design. The design should frame the gemstone and be chosen to exemplify and show off the rutile pattern within the finished quartz gemstone. At the same time, you are considering your frame, you also have to consider the function of the finished gemstone. Is the finished gemstone going to be used in a ring, necklace, pendulum or be a collector gemstone? Let the size of your rutile pattern dictate both the gemstone design and the use of the finished gemstone. Again, this part of the process is the most critical to producing a successful outcome. Sometimes both designs, rutile and gemstone form, are obvious and other times it may take hours, if not days, to make your design choices. Do not hurry. If you do not see it, choose another piece of rutilated rough or ask someone else for their design vision.
Avoid faceting a perfect crystal specimen. It is already a collector’s piece finished by the hand of the creator. There are plenty of broken crystals that you can purchase and use. Pass on the perfect specimen and find a damaged crystal to facet.
|
Preforming Rutilated Quartz Safely
Now that you have both designs, you have to choose the size that makes sense for both the design and purpose of the finished gemstone. Once you have the size established, outline the gemstone design on the rough crystal with a marker so you can begin to preform your rough. Preforming rough is the process where you remove the majority of the rough crystal that will not be used. This can be done with saws or grinding wheels. Remember to wear safety glasses and ear protection, and follow the machine’s instructions when sawing and grinding. Once you have the crystal roughed into a shape and size close to your design, place a flat spot on the rough piece where you are going to attach your dop. This spot will eventually be the table of the gemstone.
The dop is a brass holder that attaches to the gemstone and then is inserted into the faceting machine. This holds the stone in place while it is faceted. Attaching the stone securely to the dop is an important part of the faceting process because the pressure and vibrations that the gemstone receives while being faceted could potentially cause the stone to detach from the dop. There are two ways to attach the gemstone to the dop. The traditional way is to use a special wax made for dopping gemstones. The dop, wax and gemstone are all heated to the same temperature and then the wax is used to attach and form a bond between the gemstone and the dop. The more modern method is using a special glue, like Loctite 404.
Both ways of dopping have their advantages and disadvantages, but the wax method is more traditional and I think it has a bit of old-world charm to it. Test the strength of the gemstone and dop bond before proceeding to prevent the detachment of the gemstone from the dop during the faceting process. Testing is done by trying to snap off the dop using moderate pressure.
Faceting and Polishing Rutilated Quartz
The faceting process has two main parts, just like the gemstone. The gemstone has a pavilion which consists of the bottom and girdle of the gemstone. This part of the gemstone is traditionally faceted first. The second part of the gemstone is the crown, which is the top of the gemstone along with the table. Facet the pavilion and girdle first while keeping in mind that the width of your girdle will determine the size and weight of the finished gemstone.
Faceting the pavilion is done on the faceting machine by grinding the gemstone away using flat grinders called laps. The laps come in different grits of diamond. Diamond is used as an abrasive and comes in different grits/sizes. The measurement of grit is by particle per inch. When faceting a gemstone, one can start at 260 grit, which is 260 diamonds lined up to comprise the measurement of an inch, all the way up to 60,000 grit, which is 60,000 diamond particles per inch.
Faceting is the process of adding and removing scratches to the gemstone until it looks polished, shiny and wet. The sequence of laps used usually follows a pattern close to a doubling of the grits, for example, 260, 600, 1,200, 3,000, 8,000, 14,000 and 60,000. When faceting and polishing rutilated quartz, I like to take the gemstone to a pre-polish of 8,000 and polish with cerium oxide, a rare Earth material that gives quartz a polish and shine that makes it look like glass.
|
Exposing Rutile
Be aware that since the rutile is a natural inclusion, it will break through the surface of the quartz gemstone. This can cause problems that we do not traditionally see in homogenous gemstones. These problems can manifest as exposed rutile, non-polished areas, and voids where the rutile needles have fallen out of the quartz. This is standard for rutilated quartz gemstones. I recommend accepting these small imperfections as part of the beauty of the gemstone material.
Transferring and Final Polish
Once you have the pavilion faceted and polished, the gemstone is then attached to another dop using a transfer jig. This aligns the gemstone accurately so you can remove the original dop and facet the crown and table of the gemstone. Follow the same process as faceting and polishing the pavilion and girdle.
The last part of the process is putting in the table. This is done by using a table adapter that gives you the ability to cut the top of the gemstone with the laps carefully. The gemstone is released from the dop and wax, or the glue is removed by either or both heat and acetone.
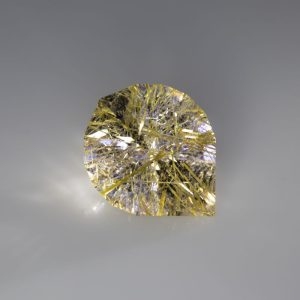
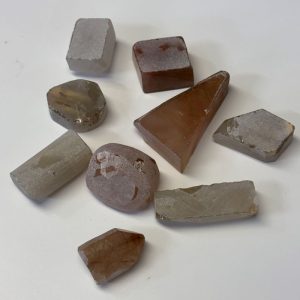
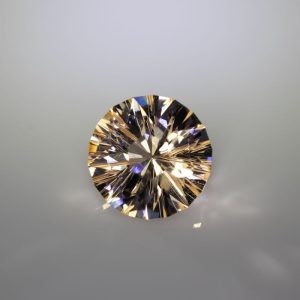
The whole faceting process can take from three hours to nine hours depending on the size of the gemstone and the complexity of the gemstone design. The larger the number of individual facets, the longer the process. This long faceting process has a spectacular reward when the gemstone is released from the dop, cleaned with alcohol and a gem cloth, and then viewed under proper lighting or outside on a sunny day. At this time, one forgets about the tedious and precise work used to achieve the finished gemstone and revels in the rutilated quartz gemstone’s beauty and wonder.
|

What to Do With Your Finished Rutilated Quartz
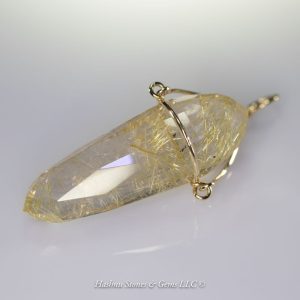
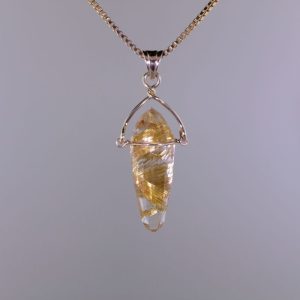
Now that you have your finished rutilated quartz gemstone, you need to decide what to do with it. Personally, my friends, family, and clients find rutilated quartz gemstones very desirable and rarely do they stay in my lapidary studio for more than a few days. The finished gemstones are mostly sold to be set in jewelry, however, there is a market for larger collector gemstones made from this gorgeous material.
Working with rutilated quartz is a fascinating process. The faceting process takes a little longer in the design stage, but the time spent framing the rutile crystal inside the quartz with the perfect design is where the magic resides.
This story about faceting rutilated quartz appeared in Rock & Gem magazine. Click here to subscribe. Story and photos by Mark Oros.


