
Digital art with minerals is a unique way to transform photographs of mineral specimens into stunning works of art. By using digital tools like Photoshop Elements, artists can fine-tune colors, textures, and effects much like traditional painters manipulate pigments and brushes. Each tool offers a range of adjustments, giving rise to almost infinite creative possibilities that reflect the artist’s individuality.
Some may argue that digital art isn’t “real” art because it can be easily duplicated. However, the same could be said of iconic works like the Mona Lisa. Reproduction doesn’t diminish the creativity, skill, or emotional impact of the original piece.
Whether you’re a skeptic or a believer, experimenting with minerals as digital subjects can be both enjoyable and rewarding. Below are seven tips to help you get started and explore the possibilities of digital art using mineral photography. Practice on a photo that you don’t care about and experiment to find the tools that will give you the effects you desire.
Step-by-Step Tips to Create Digital Art with Minerals
- Start with the best photograph of the mineral that you can produce.
- Size and compose the image as it will appear in the final product.
- Under “Enhance,” use “Auto Color Correction” and “Adjust Lighting.”
- Under “Filter,” choose “Artistic” then “Dry Brush.” This is where a multitude of variations begins. A good starting point is to set the three variables under dry brush to the following values: brush size – 2; brush detail – 7 and texture – 1. Apply the tool twice.
- Under “Filter,” choose “Artistic” then “Watercolor.” A good starting point is to set the three variables under watercolor to these values: brush detail – 14; shadow intensity – 0 and texture – 2. Apply the tool once.
- Do not be afraid to try other tools as you can always use “Edit” and “Undo” to get back to the previous image.
- When you are satisfied with your image, name it under “Save As” so you will retain your original starting image.
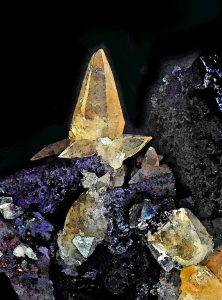
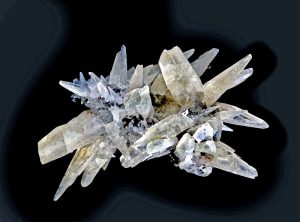
Calcite and fluorite from Hardin County, IL
Saving and Sharing Your Digital Mineral Art
As a final example, the process of creating digital art with minerals can become much more complex and nuanced than the simple examples shown here. In the living world, artists often combine multiple tools, layers, and effects to capture subtle textures, lighting, and color variations, producing work that is uniquely their own.
The tips and images shared in this article are designed to help you get started, but the real growth comes from experimentation. Don’t hesitate to try different tools, filters, and settings until you achieve an image that truly reflects your vision. With patience and creativity, your digital mineral art can evolve from a simple photo into a piece you’re proud to display on your wall.
Digital art with minerals opens endless possibilities—keep experimenting until your next masterpiece is complete.
This story about digital art with minerals previously appeared in Rock & Gem magazine. Click here to subscribe. Story and photos by Richard Gross.


