
Artifacts are fun to find and offer a tangible link to the past. Imagine the excitement of seeing an 8000-year-old hand-fashioned rock partially covered with sand and clumps of soil in a remote field, just waiting to be found. Best of all, if you find one stone artifact, there are probably more.
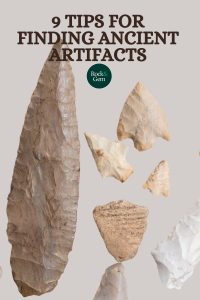
This is what artifact hunting is all about – finding ancient tools, weapons and stone pieces that have remained hidden for thousands of years. These implements are often the only evidence remaining of the existence of ancient, complex and highly-functioning cultures that once thrived in North America.
Bits and pieces of chipped flint, granite, jasper and other hard rock can rise to the surface after land is plowed or following a heavy rain, indicating the likely presence of artifacts. Whether located near the water’s edge, in open fields, on mountain ridges, valleys or under overhangs, stone clues reveal locations where ancient family groups lived more than 15,000 years ago.
Artifacts Tell a Story
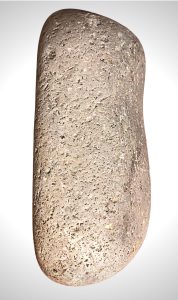
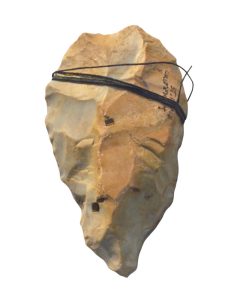
Granite and other rock artifacts tell the story of early human presence in every section of North America. A variety of rocks were shaped and used as tools. Flint and quartz were fashioned as fire starters. Obsidian and agate were flaked and chipped to be made into knives for blunt instruments such as axes and pestles. Hammerstones and heavier rocks, made of sandstone were ground to useful shapes and implements.
As early cultures traveled along rivers and valleys, cutting across heavily forested land, they continuously manufactured and replenished their rock instruments, chipping and grinding their tools for hunting farming, and cooking.
Hoes, hatchets, awls, drills, scrapers, and spear points as well as small projectiles were fashioned, sharpening and polishing stones, all chipped from rock carefully chosen. These chipping, flaking, carving activities remained unchanged, over thousands of years.
Before getting started, here are nine things to consider to help with finding artifacts and staying safe while doing so.
1. Get a Map
Topographical maps are a basic tool used to study ancient land areas. The U.S. Geological Survey (USGS) has been the primary mapping agency of the United States since 1879. At the U.S. Geological Survey website, you can order paper maps showing ancient forests, rivers and mountainous areas.
General-use maps present detailed elevation and contour lines to help with understanding the landscape. State or county libraries are a source for geological surveys.
Ordinance Survey maps are the best-known type of topographical map. It is possible to work out your exact location by following the contours and checking out the landscape around you, identifying landmarks such as lakes and roads. If you know a river that has remained in the same general configuration for a long time, it is a great place to find ancient rock tools since the area is likely to have been inhabited or visited over the millennia. To order any map, go to MyTopo.com.
2. List of Supplies
Things to take with you include a shoulder bag or backpack with bottled water, magnifying glass, hand digger, garden gloves, small brush and a notebook with pen as well as some sort of container with soft wrapping for any rocks you wish to keep. Carrying a fully-charged cell phone is essential for emergency and can be used for image-taking.
Remember to never go hunting alone in unfamiliar places and always let someone know where you will be.
Wear sturdy shoes or boots and a hat for protection from the elements. Carry a walking stick for climbing support, to clear debris or chase away snakes. Watch where you put your hands if you’re working in brush or rocky terrain. A few simple first-aid items are advantageous for cuts and scrapes. Keep spare clothes, extra water and extra shoes in your vehicle.
3. Permission to Search
For most places, receiving permission to hunt is imperative. Study your state laws before you begin to search; not doing so could get you in hot water with State or Federal authorities. Knowing on whose land you are hunting is essential, out of respect for both the land owner and for any original native residents.
If you are considering privately owned land, you will need permission to hunt on it. When you locate a prospective site, find out whether the land is private property. If it is, ask the owner for permission to search. Most landowners are cooperative, but if not, don’t be discouraged, just move on and keep inquiring in the general vicinity you have chosen.
All artifacts belong to the owner, unless you have permission to keep what you find. It is best to approach farmers at a time of year when the land has not been newly seeded or planted and assure them that you will cause no harm and of your appreciation for the opportunity.
4. Areas to Explore
Aside from farmland, sites off the beaten path are always worth a look, even construction sites may yield artifacts. Prehistoric people rarely camped more than a short distance from water and often chose ground that was easily defendable.
Across from what are now state lines, trails and trading paths were created, crisscrossing through forests and rivers, covering large tracts of land. Villages were not only established near river junctions, but on hillsides and valleys. Many artifacts have been found near both small and large waterways. Some examples include corner-notched spear points and fluted points as well as side-notched arrowheads.
By reading about tribes that settled in your area, you can find the most likely locations. Riverbanks, streams and dry ditches can disguise partially hidden artifacts. Dirt banks where implements may have washed off higher ground should be checked. Choose places where the ground has been disturbed or if dirt has been brought in to build or construct any housing areas.
5. Field Clues
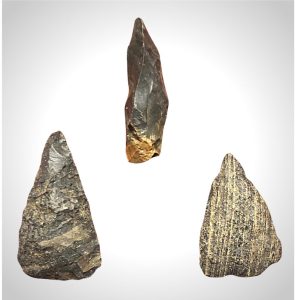
When searching, keep your eyes open for chips of stone, regardless of color, size, coarseness or shape. Stone chips are always worth examining. What you see exposed may not be the entire piece. Although there are many stone tools to be found, such as scrapers and hoes, be receptive to the unexpected rocks that catch your eye.
It won’t be long before you develop a sixth sense about whether the rock you are holding had been held by another human hand long before yours. Small chips were further manufactured for knives, awls or gravers. Large rocks should be examined also. Pounders, some hand axes and hoes were not flaked like a typical arrowhead or knife, but were smoother and ground into shape.
6. How Deeply Can You Dig?
Federal law states that you can retrieve any artifact that is lying on the ground’s surface. If an artifact is partially exposed and easily retrieved, you are allowed to collect it. If not, you can carefully dig a certain distance around and beneath the artifact to loosen it. Protect fragile parts by bringing along an attached dirt clod. Rules regarding depth of digging may seem trivial, but they were made to protect sacred grounds, burial sites and evidence of those who lived on the land first.
7. When to Search
The best time of year to search depends on where you live. For northerners, tramping through wooded areas covered in snow would be unproductive. In agricultural areas, fall and very early spring can yield exposed stone artifacts. In western states and the deep south, the time of year may not be as relevant an issue. Check with farmers and landowners about dates and times of clearing the fields and planting seeds. Consider storms, floods and wildlife. Overall, cloudy and overcast days are best for artifact spotting.
8. Rock Types
Study and learn your location’s rock types. Some common artifact materials are quartz, chert, jasper, chalcedony, agate, basalt, granite and flint. Rhyolite is common in the southern states while quartzite is familiar in the southwest. Arrowheads were made out of anything handy, so focusing on particular rock types can lead to overlooking artifacts. Remember, the ancients travelled and traded.

9. Taking Care of Finds
Cleaning and care of artifacts is important as you don’t want to mismanage an ancient piece of art. First, wrap it in a soft cloth to keep it from knocking against another artifact. Rocks are not unbreakable, especially the tip, fashioned point or notched sides of arrowheads. It’s good to separate large pieces from delicate ones.
After returning home, wash pieces with water and use a soft brush to wash away any dirt clumps. Before washing, make sure the drain is closed so any small pieces are not lost.
Once dry, examine your findings carefully. Using an identification guide, set up a journal with columns, listing date, location where found, type of rock, probable use, time period, shape and workmanship. Write a thorough description of the rock. Give each rock an identifying number or symbol that corresponds to the name you have recorded. This is an essential part of artifact collecting and, if not followed, can cause future confusion and unhappiness.
From east to west, north and south, clues to ancient people’s existence continue to surface, and may be found anywhere in North America. Once your eye is trained, you may find artifacts at unexpected times and places, even your own backyard. Artifact hunting can become a life-long source of discovery and yield increasing appreciation of the inventiveness, survival and history of earlier Americans.
Enjoy the hunt!
This story about finding ancient artifacts previously appeared in Rock & Gem magazine. Click here to subscribe. Story and photos by Anita B. Stone.


