
By Russ Kaniuth
Each year many old materials are depleted and become rare or hard to find, but at the same time, there are new materials often introduced into the lapidary market.
Many of the new materials are sought after by avid rockhounds hunting new terrains and trying to find untouched ground to dig. In some cases, new materials are discovered purely by accident, by a rockhound just being a rockhound.
Bold Brush Strokes of Color
Last year a new variation of Picasso Marble was discovered by a rock dealer out on a hunting trip. Once he brought it home, he cut it to find out what he really had, and he’s now anxious to go back for more.
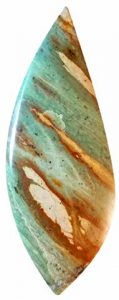 Picasso Marble has always been a fan favorite in the lapidary world. You may have heard it called Picasso stone or Picasso jasper, but it’s actually a marble (metamorphic limestone stained with sulphides). Picasso Marble is mainly known for its black and grey brush strokes, which is where it got its name — after the artist Pablo Picasso.
This newly found variation is very similar in pattern but different in coloring. Its greens stand out with subtle accents of gold and brown strokes on a grey background, giving it that “camo” look.
Before diving in to slab the material, wet the rough to see where the pattern is, and determine the direction that will yield the desired patterns you are looking for. The strands of color will change with each slab, which provides lots of options to design cabs. Once you have your slabs cut and ready to draw out your designs, you may want to use a pencil instead of a sharpie to draw on this material. Ink will soak deeply into this material and will be tough to grind off later.
Hardness Difference Awareness
Cabbing this material is super easy, but there is one slight pitfall. There are some slight hardness differences you may run across that will develop undercutting and result in an uneven surface. The best way to cab materials like this is to shape your preform on an 80 grit wheel, then spend a lot of time on your 220 steel wheel shaping and doming your cab, and smoothing out as much as possible leaving no flat spots before moving on to the next grit.
On many other materials, you might just use the 220 to take out the majority of the heavy scratches and smooth the dome over. Then move on to 280 grit to smooth the material and remove all the deep scratches. However, in this case, the 280 could cause major undercutting, so do all you can on the 220, and go softly on the 280 and 600 grit wheels.
Make sure to run a good flow of water while cabbing this material, it will froth up and make it difficult to see your drawn lines. At this point, the rest should be rather easy and it will take a beautiful glossy finish going up to 14k grit.
I certainly hope everyone gets a chance to work with this material in the coming year, it has been a lot of fun creating nice forestry scenes with these new earthy colors.
Author: Russ Kaniuth
 Is the owner of Sunset Ridge Lapidary Arts and overseer of the Cabs and Slabs Facebook group. View more of his work at www.sunsetridgelapidary.com.


