
Precious metal clay makes it surprisingly easy to create your own fine silver jewelry and holiday ornaments—even if you’re not a trained silversmith. Using this versatile PMC material, you can transform a simple sand dollar into a shimmering silver pendant or decoration right at your kitchen table. With just a mold, a small butane torch, and a bit of creativity, this beginner-friendly technique lets you craft handmade silver pieces that capture the beauty of the beach and the magic of the season.
What Makes PMC Unique
I first encountered precious metal clay, aka PMC, from a local crafts store owner who was demonstrating how to use it at our county fair. It looked easy, with minimal equipment or know-how needed, so—being a lazy man—it intrigued me. But (being a lazy man) I didn’t pursue it right away. First, I needed to know the subject better.
PMC is a moldable, clay-like material manufactured by combining powdery-fine particles of precious metals with water and non-toxic organic binders. It was developed in Japan in the 1990s, and Japan continues to be the primary producer. It comes in many varieties: fine silver (99.9% pure silver), sterling silver, gold, copper and bronze. When the binder is burned off, you’re magically left with a pure metal product.
Choosing the Right Silver Precious Metal Clay
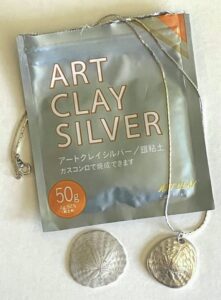
The PMC I generally use is silver; specifically, Art Clay™ Silver from AIDA Chemical Industries in Japan. I generally purchase 50-gram packets online from Art Clay World of Oak Lawn, Illinois, although I’ve also purchased via Fire Mountain Gems, Amazon and eBay. Be careful, though, with online purchases from unknown sources. The clay can go bad, drying and hardening if stored too long.
I go with fine silver because most of the other metal varieties need to be fired in a kiln. With fine silver, you just need a small torch of the sort chefs use.
Step One: Select Your Object and Create a Mold
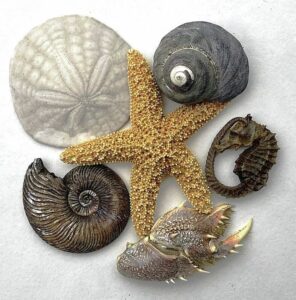
PMC can be shaped by hand and sculpted like ordinary modeling clay, but I prefer using a mold. In my lapidary work, I like to craft jewelry from locally sourced materials combed from beaches. One month, during a full moon, tides were especially low, and while walking my dog, I came across dozens of sand dollars. I selected one and, reflecting on that county fair demonstration, I decided it was time to learn the craft to capture the image of these little starred wonders in silver.
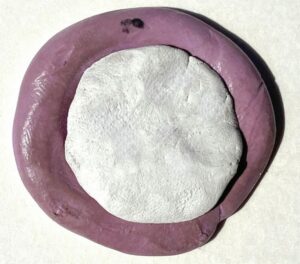
To make a mold, I initially used plaster, but found it difficult to remove my clay, even after slathering the mold with olive oil, the preferred lubricant when working with sticky PMC. Later, after watching YouTube videos, I crafted much better molds with 10 Minute Cold Molding Compound. It comes in two jars and is a lot like silly putty, with one batch white, the other purple. They remain soft and squishy until you fold and mix them together. Quickly roll into a ball, flatten like a hamburger patty, and press in your sand dollar, then set a timer for ten minutes. It firms up into a reusable latex-like mold similar to molds dentists make of teeth.
Step Two: Shape and Press the Precious Metal Clay
In working with PMC right out of the package, work on an acrylic sheet where you’ve sparingly rubbed olive oil. Also, rub olive oil into your hands so the damp clay doesn’t stick to your fingers. Manipulate it as little as possible. The more you play with it, the stickier it becomes.
Work fast! The precious metal clay arrives in a cellophane wrapping and is further sealed in a plastic pouch. This is because it dries relatively quickly once the double packaging is open. Before opening, know what you want to make, have your molds ready, and hop to it!
For the size of my projects, I cut a fifth or sixth of a 50-gram bar of clay. While working with my piece, I keep the rest on a damp paper towel covered with cling wrap to keep it moist. I’ll press my piece to flatten it a bit more and to round it to the size of my mold, which I’ll then fill, pressing the clay firmly to capture the sand dollar’s petals and plates. I’ll dip a finger in distilled water and gently rub to smooth the top of the clay and remove my fingerprints and any creases.
Step Three: Add Texture and Refine the Piece
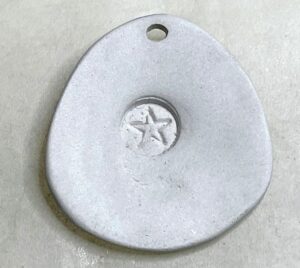
Unlike a fully three-dimensional silver casting, your back will be blank unless you add something. So while it’s still in the mold, I add decorative details. I use a metal stamp for a star or flower-like imprint right in the middle. You could add a name or initials (if intended as a gift for a specific person), a heart, your maker’s mark (if you have one), or a mark to indicate fine silver (Ag 999 or 999 FS).
Removing your precious metal clay is a snap. Let it sit for a few minutes, then turn the mold over and slightly twist. Out pops your clay.
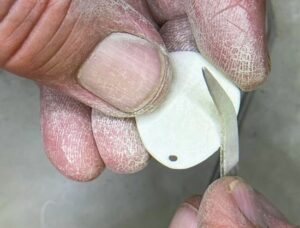
While the clay is still damp, pierce a hole for a jump ring using a plastic stirrer/straw picked up at a coffee shop. (In addition to being lazy, I’m also cheap and will grab free tools wherever I can!) Add any other decorative details you may desire while the clay is still damp and pliable. Then use a sharp blade to trim off excess clay.
Step Four: Dry and Smooth Your Casting
Allow the clay to dry for at least 24 hours. You can hasten this in several ways, such as blow-drying with a hair dryer or placing it on a mug warmer. Being a lazy man, I just let nature take its course and go with natural air drying. But how to know if it’s thoroughly dry? Set it on a mirror and see if it leaves any foggy moisture. If not bone-dry, pockets of water may cause cracks during Step Five.
Next, I use a variety of needle files and sandpaper (600, 1200, 2000 grit) to sand rough edges and make the back smooth.
Any imperfections will show in the finished product, so make it as good as possible during this stage. It’s far easier to remove a pit in clay than in solid silver. Work gently, though. I’ve had pieces snap in two when sanding too aggressively.
Do this work over a sheet of waxed paper to capture grains of dried silver clay. Don’t waste even a microgram! I store it in a wee bottle. I also keep any bits of clay that I trimmed in Step Three and, when they’re dry, I grind them to dust with a mortar and pestle and add them to the dust from filing and sanding. I’ve found I can reconstitute this dust with distilled water to create a silver clay paste that can be painted onto leaves.
Step Five: Torch-Fire Your Silver Precious Metal Clay Pendant
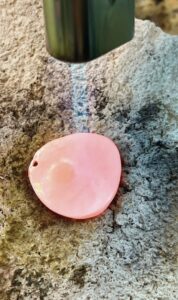
For the firing process, I have a granite slab where I place an insulating fire brick. Fire the clay on the brick with a handheld butane torch, anywhere from 90 seconds to five minutes, depending on the size of the object. My sand dollars are thin 10-gram pendants the size of a quarter and take just 90 seconds, which I time. This burns away the water and organic binder in the clay and sinters the metal particles.
In seconds, the binder burns away with a dramatic burst of smoke and flames, so do your firing in a ventilated area. Continue firing, circling the flame of your torch over and across and around about two inches above your clay. It eventually turns bright pink. Exercise care. If your flame gets too close for too long and the piece gets too hot, you’ll instantly see a silver splash indicating your pendant is melting.
Pick up your hot, hot piece with extra-long tweezers and quench in distilled water held in a small metal container like a tuna can. With a little fizzle and pop, your pendant is instantly cool enough to pick up with fingers.
Step Six: Polish and Finish the Silver
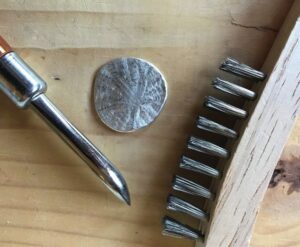
You now have a piece of 99.9% pure silver, but it sure doesn’t look like it. Why is it bright white? When a nail oxidizes (rusts), it develops an orange rind. That white color on your sand dollar? It’s a thin layer of oxidized silver that’s easily removed by rubbing with a stainless steel brush. For a velvety matte finish, stop after brushing. For a high polish with a mirror-like finish, proceed to rub with a steel or agate silversmithing burnisher. All that’s left is to add a jump ring, insert a chain, and wear with hand-made pride!
A Few Cost Considerations with Precious Metal Clay
The only problem I’ve had with PMC? It ain’t cheap! As I write, the standard retail price for a 50-gram packet recently jumped from $138 to $146, although I’ve seen it advertised on Amazon for $99. (It also comes in cheaper packets of 7g, 10g and 20g.)
In parting, be careful not to get too good at this craft. Remember that person demonstrating at the county fair who initially hooked me? Well, that’s now me! See you later. I’m heading to the fairgrounds…
Tools and Supplies You’ll Need
- Precious metal clay
- 10 Minute Cold Molding Compound
- Olive oil
- Distilled water
- An acrylic sheet as a work surface
- X-ACTO knife
- Metal stamps (optional)
- Needle files
- Wet/dry sandpaper (600, 1200, 2000 grit)
- Plastic coffee stirrer/straw
- Waxed paper
- Granite slab
- Insulating fire brick
- Extra-long tweezers
- Tuna can or a similar metal container
- Butane torch + can of butane
- Steel wire brush
- Steel or agate burnisher
- Jump rings
- Magnifier visor or hands-free magnifier
Plan for Precious Metal Clay Shrinkage
Precious metal clay shrinks approximately 8 to 10% upon firing because you burn away the organic binder. So if making an object like a ring with a size specification, you need to factor this in.
Quick Tips for PMC Beginners
- Work Fast: PMC dries quickly once unwrapped—have molds ready.
- Lubricate Surfaces: Olive oil prevents sticking on hands and work surfaces.
- Mind the Shrinkage: Plan for 8–10% reduction during firing.
- Add Personal Touches: Use metal stamps for initials, symbols, or textures.
- Fire Safely: Always ventilate and use long tweezers when torch-firing.
- Reuse Clay Dust: Sanding leftovers can be reconstituted into new clay.
- Start Small: Pendants and ornaments are beginner-friendly projects
Precious metal clay opens the door to creating unique, handcrafted silver jewelry and decorations without a professional workshop. From capturing the delicate beauty of a sand dollar to crafting a one-of-a-kind holiday gift, PMC lets beginners and seasoned makers alike explore their creativity. With simple tools, careful technique, and a bit of patience, your kitchen table can become a miniature silversmithing studio—perfect for special occasions or any time you want to turn natural treasures into lasting keepsakes.
This story about precious metal clay previously appeared in Rock & Gem magazine. Click here to subscribe. Story and photos by Jim-Brace Thompson


